docker一键部署笔记


docker一键部署笔记

原创 已于 2026-08-27 15:56:33 修改 · 粉丝可见 · 423 阅读 · 0 · 0 GEO检测 · 编辑
文章链接:https://blog.csdn.net/hacker_51/article/details/149324058

目录

docker添加远程docker主机

docker添加远程docker主机

ssh方式:

1
docker context create myserver --docker "host=ssh://root@192.168.1.100"

tcp方式:

服务端:

临时启动:

1
2
# 服务端临时启动
sudo dockerd -H unix:///var/run/docker.sock -H tcp://0.0.0.0:2375

永久配置:

1
2
3
4
5
6
7
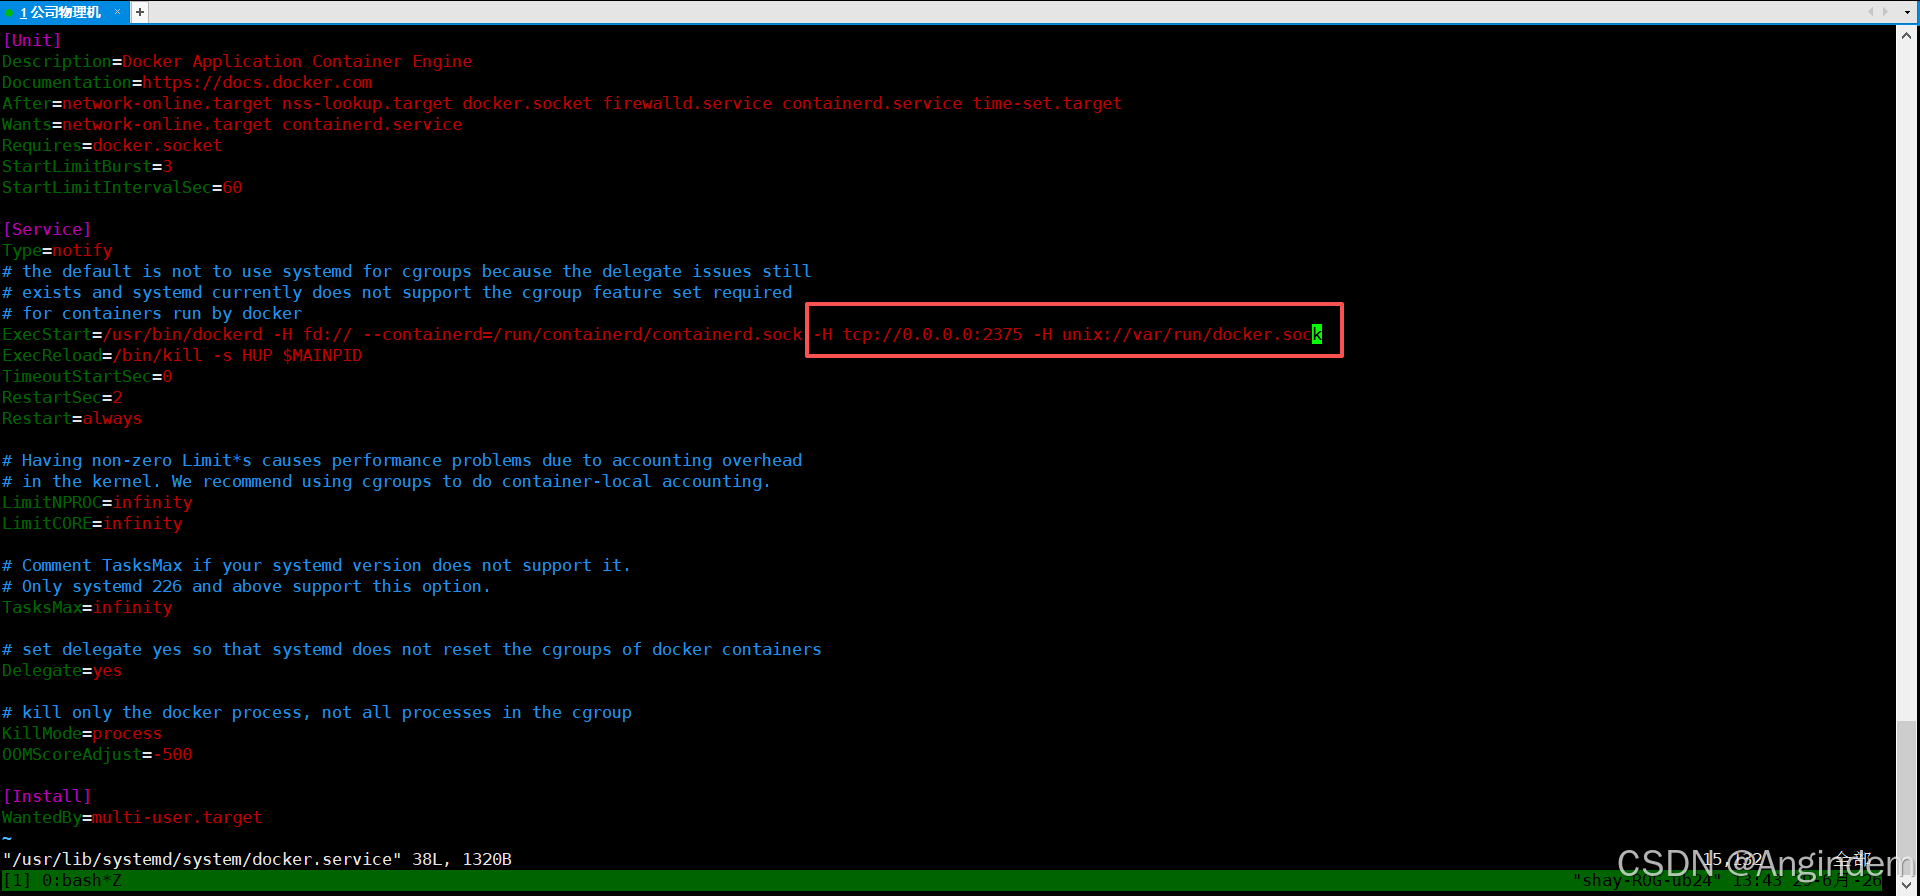
vim /usr/lib/systemd/system/docker.service


# 在此行后面增加配置:
# ExecStart=/usr/bin/dockerd
# 新增:
# -H tcp://0.0.0.0:2375 -H unix://var/run/docker.sock

客户端:

1
docker -H tcp://192.168.5.54:2375 ps

openssl 生成32位随机数

1
openssl rand -base64 32

数据库

gbase8s

镜像官网: https://hub.docker.com/r/liaosnet/gbase8s

1
2
3
4
5
6
7
8
9
docker run -d -p 19088:9088 \
--name node01 --hostname node01 \
-e SERVERNAME=gbase01 \
-e USERPASS=GBase123$% \
-e CPUS=1 \
-e MEMS=2048 \
-e ADTS=0 \
-v $PWD/gbase8s/data:/opt/gbase/data \
liaosnet/gbase8s:latest

以上参数中:
端口9088为数据库使用的内部端口,需要在容器中映射,如使用19088端口

  • SERVERNAME对应的是默认服务名称:gbase01

  • USERPASS对应的是默认gbasedbt用户密码:GBase123$%

  • CPUS对应的是限制容器中使用的cpu数量:1

  • MEMS对应的是限制容器中使用的内存总量: 2048 MB

  • ADTS对应的是数据库是否开启审计:0 表示不开启(默认), 1 开启

其它参数:

  • MODE数据库主备集群节点的角色,standard|primary|secondary

  • LOCALIP本节点使用的IP地址,用于集群时指定IP

  • PAIRENAME集群对端数据库实例名称,默认gbase02

  • PAIREIP集群对端节点的IP地址,用于集群时指定IP

数据库连接

JDBC JAR: https://gbasedbt.com/dl/jdbc⁠
类名:com.gbasedbt.jdbc.Driver
URL:jdbc:gbasedbt-sqli://IPADDR:19088/testdb:GBASEDBTSERVER=gbase01;DB_LOCALE=zh_CN.utf8;CLIENT_LOCALE=zh_CN.utf8;IFX_LOCK_MODE_WAIT=30;
用户:gbasedbt
密码:GBase123$%
其中:IPADDR为docker所在机器的IP地址,同时需要放通19088端口。

postgres

1
2
3
4
5
6
docker run --name postgres \
-e POSTGRES_PASSWORD=123456 \
-p 5432:5432 \
-v $PWD/postgre/data:/var/lib/postgresql \
--restart=always \
-d postgres

默认 登录用户名: postgres

如果遇到  FATAL: password authentication failed for user “XXX”

有可能防火墙的问题,禁止外部访问

解决方法: 在 data 的 pg_hba.conf 中的  ipv4 添加以下一行

1
2
3
4
 
# IPv4 local connections:
host all all 127.0.0.1/32 trust
host all all 0.0.0.0/0 trust

MySQL

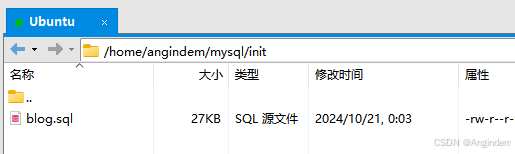
第一步:创建对应的本地挂载目录

1
cd /home/angindem && mkdir mysql && cd mysql && mkdir data conf init

第二步:将配置文件以及初始化sql脚本放到我们对应的挂载目录中

配置 angindem.cnf 文件命令:

1
echo -e "[client]\ndefault_character_set=utf8mb4\n\n[mysql]\ndefault_character_set=utf8mb4\n\n[mysqld]\nbind-address = 0.0.0.0\ncharacter_set_server=utf8mb4\ncollation_server=utf8mb4_unicode_ci\ninit_connect='SET NAMES utf8mb4'" > angindem.cnf

第三步:创建并运行指定挂载docker命令
1
2
3
4
5
6
docker run -d  --name mysql3  -p 3318:3306 \
-e TZ=Asia/Shanghai \
-e MYSQL_ROOT_PASSWORD=123456 \
-v $PWD/mysql/data:/var/lib/mysql \
-v $PWD/mysql/init:/docker-entrypoint-initdb.d \
-v $PWD/mysql/conf:/etc/mysql/conf.d mysql

redis

创建两个文件夹

1
mkdir data conf

在 conf 中增加配置文件 redis.conf

1
2
3
4
5
6
7
8
9
10
11
12
13
14
15
16
17
18
19
20
21
22
23
24
25
26
27
28
29
30
# Redis 服务器配置

# 绑定的 IP 地址,默认为本地回环地址 127.0.0.1
# 外网访问需注释掉此行
# bind 127.0.0.1

# 监听的端口,默认为 6379
port 6379

# 设置密码
requirepass youpassword

# 启用 AOF 持久化模式
appendonly yes

# 持久化方式。可选项:always, everysec, no
appendfsync everysec

# AOF 文件名称,默认为 appendonly.aof
appendfilename "appendonly.aof"

# AOF 自动重写触发条件
auto-aof-rewrite-percentage 100
auto-aof-rewrite-min-size 64mb

# 设置最大内存限制(单位:字节)
maxmemory 2gb

# 内存淘汰策略。可选项:volatile-lru, allkeys-lru, volatile-random, allkeys-random, volatile-ttl, noeviction
maxmemory-policy allkeys-lru

一键部署启动

1
2
3
4
5
6
7
docker run --restart=always \
-p 6379:6379 \
--name redis \
-v $PWD/redis/conf:/etc/redis \
-v $PWD/redis/data:/data \
--log-opt max-size=100m --log-opt max-file=3 \
-d redis:7.0.12 redis-server /etc/redis/redis.conf

代理服务器

nginx

创建目录

1
cd /home/angindem && mkdir nginx && cd /home/angindem/nginx && mkdir html data

存放nginx.conf 到 data 中

1
2
3
4
[root@localhost data]# pwd
/home/angindem/nginx/data
[root@localhost data]# ls
nginx.conf

执行部署

1
2
3
4
5
docker run -d --name nginx \
-p 80:80 \
-v $PWD/nginx/html:/usr/share/nginx/html \
-v $PWD/nginx/data:/etc/nginx \
nginx:stable-alpine && docker logs -f nginx

npmplus

1
2
3
4
5
6
7
8
9
docker run -d \
--name npmplus \
--restart unless-stopped \
-p 80:80 \
-p 443:443 \
-p 81:81 \
-v $PWD/npmplus/data:/data \
-e TZ=Asia/Shanghai \
zoeyvid/npmplus

出现 docker pull 错误

Error responsefrom daemon: Get “https://registry\-1\.docker\.io/v2/“: net/http: request canceled

原因:

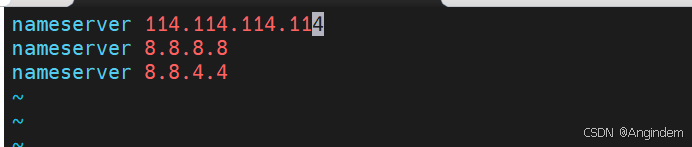
  1. 配置DNS 没有指向 114.114.114.114

  2. docker 远程仓列表中没有存储相对应的docker镜像

解决方法:
1、配置DNS
1
vim /etc/resolv.conf

2、配置可用的docker镜像源
1
vim /etc/docker/daemon.json

可以用我的作为参考:

1
2
3
4
5
6
7
8
9
10
11
12
13
14
15
16
17
18
19
20
21
22
23
24
{
"max-concurrent-downloads": 10,
"max-concurrent-uploads": 5,
"default-shm-size": "1G",
"debug": true,
"experimental": false,
"registry-mirrors": [
"https://docker.m.daocloud.io",
"https://docker.1ms.run",
"https://ccr.ccs.tencentyun.com",
"https://hub.xdark.top",
"https://hub.fast360.xyz",
"https://docker-0.unsee.tech",
"https://docker.xuanyuan.me",
"https://docker.tbedu.top",
"https://docker.hlmirror.com",
"https://doublezonline.cloud",
"https://docker.melikeme.cn",
"https://image.cloudlayer.icu",
"https://dislabaiot.xyz",
"https://freeno.xyz",
"https://docker.kejilion.pro"
]
}
3、重启配置
1
systemctl daemon-reload && systemctl restart docker

最后就可以成功运行了

使用细节

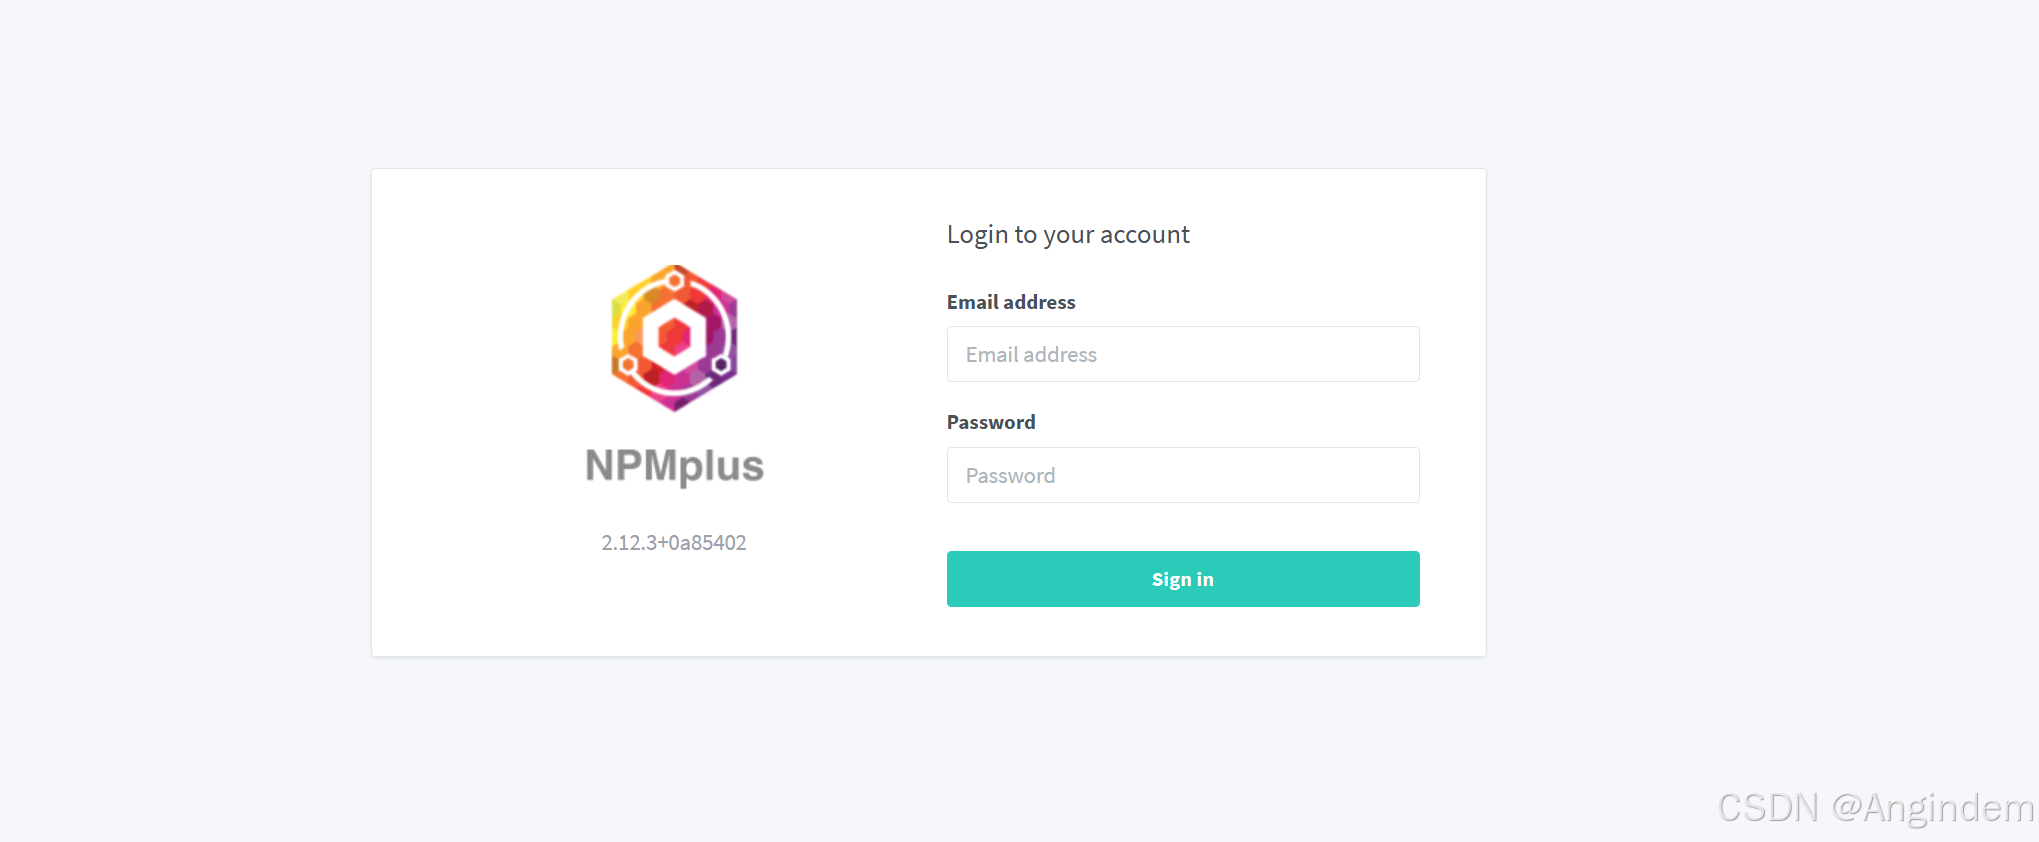
访问localhost:81

访问登录成功。 新版本访问即注册管理员账户。

旧版本:

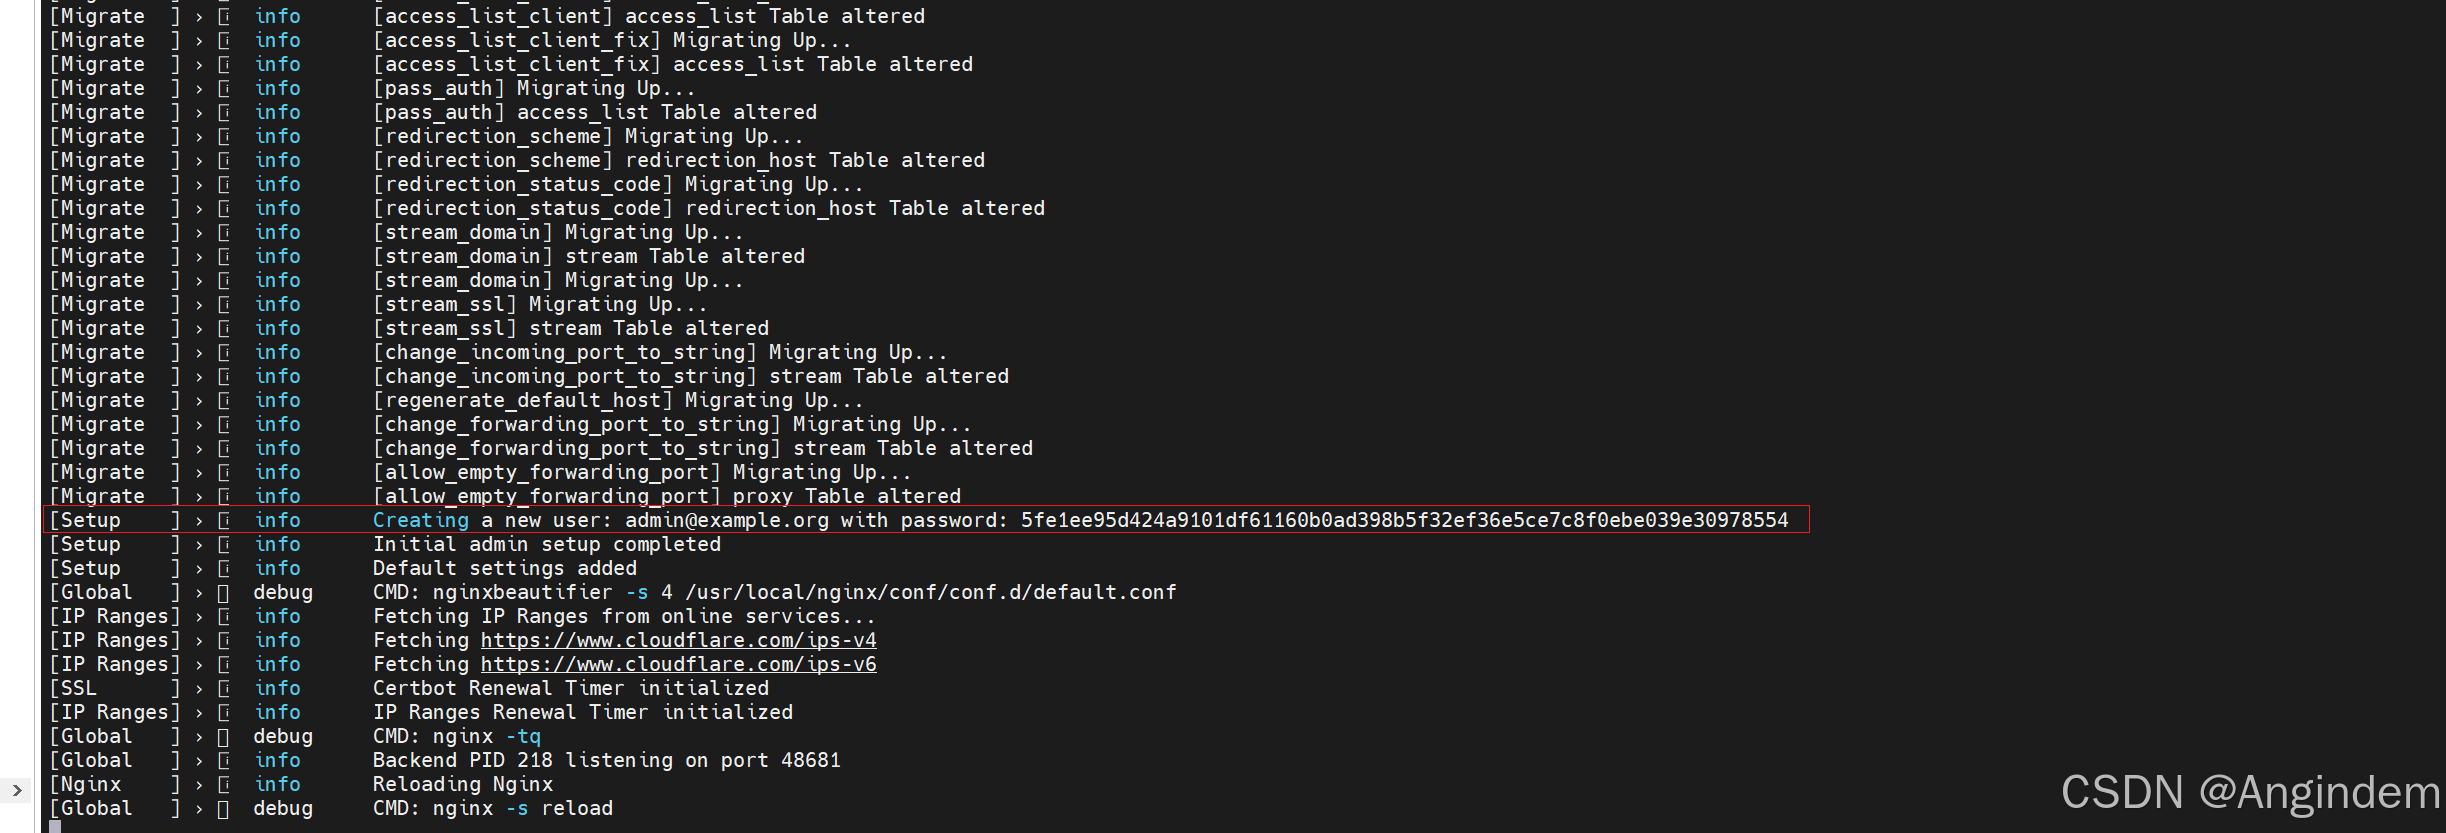
默认管理员用户电子邮件和默认管理员密码会打印到 NPMplus docker 日志中。查看启动日志可以看到 默认的账号密码

1
docker logs npmplus

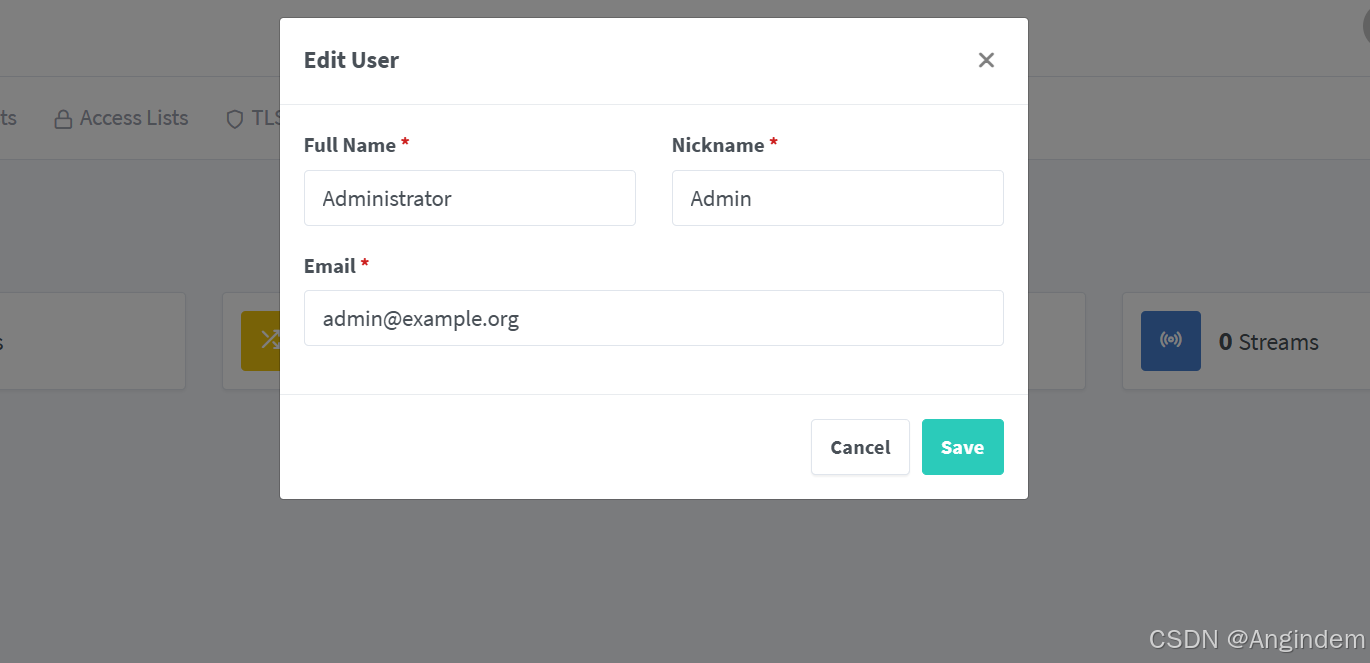
使用默认用户登录后,系统会立即要求您修改详细信息并更改密码。

微服务

MinIO

1
2
3
4
5
6
7
8
9
docker run -p 9000:9000 -p 9090:9090 \
--name minio \
-d --restart=always \
-e "MINIO_ACCESS_KEY=admin" \
-e "MINIO_SECRET_KEY=admin123" \
-v $PWD/minio/data:/data \
-v $PWD/minio/config:/root/.minio \
minio/minio:RELEASE.2025-04-22T22-12-26Z server \
/data --console-address ":9090" -address ":9000"

命令解释:

(1)每行结尾的 \ ,表示命令还没输入完,先不要执行。
(2)-p 容器内部端口绑定到指定的主机端口,9000是minio服务端口,用于服务的链接和请求;  9090是minio客户端端口,用于访问管理界面。
(3)--name 指定容器名称。
(4)--restart=always重启参数,重启docker时自动重启容器。
(5)MINIO_ACCESS_KEY为设置minio登录名,不少于3个字符;MINIO_SECRET_KEY为设置minio登录密码,不少于8个字符。
(6)-v 指定挂载目录,“ : ”前为宿主机目录,“ : ”后为容器中的目录,minio上传的文件默认存储在容器中的/data目录下,若不挂载到宿主机,删除容器则删除文件,若将存储目录挂载到宿主机,删除容器不会删除宿主机挂载目录下的文件。
(7)--console-address 指定客户端端口;-address 指定服务端端口.

访问http://ip:9090,出现登录页面则部署成功。

RabbitMQ

1
2
3
4
5
6
7
8
9
10
11
12
13
14
15
16
17
18
19
docker run -d --name rabbitmq \
--privileged=true \
--restart=always \
-m 512m \
--cpus=0.5 \
-v $PWD/rabbitmq/data/:/var/lib/rabbitmq \
-v $PWD/rabbitmq/conf:/etc/rabbitmq \
-v $PWD/rabbitmq/logs:/var/log/rabbitmq \
-e RABBITMQ_MEMORY_HIGH_WATERMARK=0.6 \
-e RABBITMQ_DISK_FREE_LIMIT=50000000 \
-e RABBITMQ_DEFAULT_USER=itheima \ # MQ 默认登录用户
-e RABBITMQ_DEFAULT_PASS=123321 \ # MQ 默认登录用户的密码
--publish 5671:5671 \
--publish 5672:5672 \
--publish 4369:4369 \
--publish 25672:25672 \
--publish 15671:15671 \
--publish 15672:15672 \
rabbitmq:3.8-management

其他项目级服务

私有云Cloudrever个人网盘

Forgejo 代码仓托管平台

Nacos平台部署

RabbitMQ 消息队列部署

RustDesk私人远控服务

禅道部署

1
2
3
4
5
6
7
8
9
10
11
12
13
14
15
16
17
18
19
20
21
22
23
24
25
26
27
28
29
30
version: '3.8'

services:
zentao:
image: easysoft/zentao:21.2
container_name: zentao
restart: always
ports:
- "7272:80"
- "23306:3306"
environment:
TZ: Asia/Shanghai
MYSQL_INTERNAL: "true"
volumes:
- /home/angindem/zentao/data:/data
logging:
driver: "json-file"
options:
max-size: "100m"
max-file: "20"
networks:
zentao-net:
ipv4_address: 172.30.0.4

networks:
zentao-net:
driver: bridge
ipam:
config:
- subnet: 172.30.0.0/16

服务器初始化配置

docker、docker compose 安装

docker 安装脚本sh

1
2
3
4
5
6
7
8
9
10
11
12
13
14
15
apt update

apt install apt-transport-https ca-certificates curl software-properties-common

curl -fsSL https://download.docker.com/linux/ubuntu/gpg | apt-key add -

add-apt-repository "deb [arch=amd64] https://download.docker.com/linux/ubuntu $(lsb_release -cs) stable"

apt update

apt install docker-ce docker-ce-cli containerd.io

wget "https://pc.clougence.com/docker-compose-1.28.3" -O /usr/local/bin/docker-compose

chmod +x /usr/local/bin/docker-compose

如果第一次没有成功,多执行几次就可以了。

简易防御脚本

fail2ban配置

文件名:jail.conf

1
2
3
4
5
6
7
8
9
10
11
12
13
14
15
16
17
18
19
20
21
22
23
24
25
26
27
28
29
30
31
32
33
34
35
36
37
38
39
40
41
42
43
44
45
46
47
48
49
50
51
52
53
54
55
56
57
58
59
60
61
62
63
64
65
66
67
68
69
70
71
72
73
74
75
76
77
78
79
80
81
82
83
84
85
86
87
88
89
90
91
92
93
94
95
96
97
98
99
100
101
102
103
104
105
106
107
108
109
110
111
112
113
114
115
116
117
118
119
120
121
122
123
124
125
126
127
128
129
130
131
132
133
134
135
136
137
138
139
140
141
142
143
144
145
146
147
148
149
150
151
152
153
154
155
156
157
158
159
160
161
162
163
164
165
166
167
168
169
170
171
172
173
174
175
176
177
178
179
180
181
182
183
184
185
186
187
188
189
190
191
192
193
194
195
196
197
198
199
200
201
202
203
204
205
206
207
208
209
210
211
212
213
214
215
216
217
218
219
220
221
222
223
224
225
226
227
228
229
230
231
232
233
234
235
236
237
238
239
240
241
242
243
244
245
246
247
248
249
250
251
252
253
254
255
256
257
258
259
260
261
262
263
264
265
266
267
268
269
270
271
272
273
274
275
276
277
278
279
280
281
282
283
284
285
286
287
288
289
290
291
292
293
294
295
296
297
298
299
300
301
302
303
304
305
306
307
308
309
310
311
312
313
314
315
316
317
318
319
320
321
322
323
324
325
326
327
328
329
330
331
332
333
334
335
336
337
338
339
340
341
342
343
344
345
346
347
348
349
350
351
352
353
354
355
356
357
358
359
360
361
362
363
364
365
366
367
368
369
370
371
372
373
374
375
376
377
378
379
380
381
382
383
384
385
386
387
388
389
390
391
392
393
394
395
396
397
398
399
400
401
402
403
404
405
406
407
408
409
410
411
412
413
414
415
416
417
418
419
420
421
422
423
424
425
426
427
428
429
430
431
432
433
434
435
436
437
438
439
440
441
442
443
444
445
446
447
448
449
450
451
452
453
454
455
456
457
458
459
460
461
462
463
464
465
466
467
468
469
470
471
472
473
474
475
476
477
478
479
480
481
482
483
484
485
486
487
488
489
490
491
492
493
494
495
496
497
498
499
500
501
502
503
504
505
506
507
508
509
510
511
512
513
514
515
516
517
518
519
520
521
522
523
524
525
526
527
528
529
530
531
532
533
534
535
536
537
538
539
540
541
542
543
544
545
546
547
548
549
550
551
552
553
554
555
556
557
558
559
560
561
562
563
564
565
566
567
568
569
570
571
572
573
574
575
576
577
578
579
580
581
582
583
584
585
586
587
588
589
590
591
592
593
594
595
596
597
598
599
600
601
602
603
604
605
606
607
608
609
610
611
612
613
614
615
616
617
618
619
620
621
622
623
624
625
626
627
628
629
630
631
632
633
634
635
636
637
638
639
640
641
642
643
644
645
646
647
648
649
650
651
652
653
654
655
656
657
658
659
660
661
662
663
664
665
666
667
668
669
670
671
672
673
674
675
676
677
678
679
680
681
682
683
684
685
686
687
688
689
690
691
692
693
694
695
696
697
698
699
700
701
702
703
704
705
706
707
708
709
710
711
712
713
714
715
716
717
718
719
720
721
722
723
724
725
726
727
728
729
730
731
732
733
734
735
736
737
738
739
740
741
742
743
744
745
746
747
748
749
750
751
752
753
754
755
756
757
758
759
760
761
762
763
764
765
766
767
768
769
770
771
772
773
774
775
776
777
778
779
780
781
782
783
784
785
786
787
788
789
790
791
792
793
794
795
796
797
798
799
800
801
802
803
804
805
806
807
808
809
810
811
812
813
814
815
816
817
818
819
820
821
822
823
824
825
826
827
828
829
830
831
832
833
834
835
836
837
838
839
840
841
842
843
844
845
846
847
848
849
850
851
852
853
854
855
856
857
858
859
860
861
862
863
864
865
866
867
868
869
870
871
872
873
874
875
876
877
878
879
880
881
882
883
884
885
886
887
888
889
890
891
892
893
894
895
896
897
898
899
900
901
902
903
904
905
906
907
908
909
910
911
912
913
914
915
916
917
918
919
920
921
922
923
924
925
926
927
928
929
930
931
932
933
934
935
936
937
938
939
940
941
942
943
944
945
946
947
948
949
950
951
952
953
954
955
# jail.conf

#
# WARNING: heavily refactored in 0.9.0 release. Please review and
# customize settings for your setup.
#
# Changes: in most of the cases you should not modify this
# file, but provide customizations in jail.local file,
# or separate .conf files under jail.d/ directory, e.g.:
#
# HOW TO ACTIVATE JAILS:
#
# YOU SHOULD NOT MODIFY THIS FILE.
#
# It will probably be overwritten or improved in a distribution update.
#
# Provide customizations in a jail.local file or a jail.d/customisation.local.
# For example to change the default bantime for all jails and to enable the
# ssh-iptables jail the following (uncommented) would appear in the .local file.
# See man 5 jail.conf for details.
#
# [DEFAULT]
# bantime = 1h
#
# [sshd]
# enabled = true
#
# See jail.conf(5) man page for more information


# Comments: use '#' for comment lines and ';' (following a space) for inline comments


[INCLUDES]

#before = paths-distro.conf
before = paths-debian.conf

# The DEFAULT allows a global definition of the options. They can be overridden
# in each jail afterwards.

[DEFAULT]

#
# MISCELLANEOUS OPTIONS
#

# "bantime.increment" allows to use database for searching of previously banned ip's to increase a
# default ban time using special formula, default it is banTime * 1, 2, 4, 8, 16, 32...
#bantime.increment = true

# "bantime.rndtime" is the max number of seconds using for mixing with random time
# to prevent "clever" botnets calculate exact time IP can be unbanned again:
#bantime.rndtime =

# "bantime.maxtime" is the max number of seconds using the ban time can reach (don't grows further)
#bantime.maxtime =

# "bantime.factor" is a coefficient to calculate exponent growing of the formula or common multiplier,
# default value of factor is 1 and with default value of formula, the ban time
# grows by 1, 2, 4, 8, 16 ...
#bantime.factor = 1

# "bantime.formula" used by default to calculate next value of ban time, default value bellow,
# the same ban time growing will be reached by multipliers 1, 2, 4, 8, 16, 32...
#bantime.formula = ban.Time * (1<<(ban.Count if ban.Count<20 else 20)) * banFactor
#
# more aggressive example of formula has the same values only for factor "2.0 / 2.885385" :
#bantime.formula = ban.Time * math.exp(float(ban.Count+1)*banFactor)/math.exp(1*banFactor)

# "bantime.multipliers" used to calculate next value of ban time instead of formula, coresponding
# previously ban count and given "bantime.factor" (for multipliers default is 1);
# following example grows ban time by 1, 2, 4, 8, 16 ... and if last ban count greater as multipliers count,
# always used last multiplier (64 in example), for factor '1' and original ban time 600 - 10.6 hours
#bantime.multipliers = 1 2 4 8 16 32 64
# following example can be used for small initial ban time (bantime=60) - it grows more aggressive at begin,
# for bantime=60 the multipliers are minutes and equal: 1 min, 5 min, 30 min, 1 hour, 5 hour, 12 hour, 1 day, 2 day
#bantime.multipliers = 1 5 30 60 300 720 1440 2880

# "bantime.overalljails" (if true) specifies the search of IP in the database will be executed
# cross over all jails, if false (dafault), only current jail of the ban IP will be searched
#bantime.overalljails = false

# --------------------

# "ignoreself" specifies whether the local resp. own IP addresses should be ignored
# (default is true). Fail2ban will not ban a host which matches such addresses.
#ignoreself = true

# "ignoreip" can be a list of IP addresses, CIDR masks or DNS hosts. Fail2ban
# will not ban a host which matches an address in this list. Several addresses
# can be defined using space (and/or comma) separator.
#ignoreip = 127.0.0.1/8 ::1

# External command that will take an tagged arguments to ignore, e.g. <ip>,
# and return true if the IP is to be ignored. False otherwise.
#
# ignorecommand = /path/to/command <ip>
ignorecommand =

# "bantime" is the number of seconds that a host is banned.
bantime = 10080m

# A host is banned if it has generated "maxretry" during the last "findtime"
# seconds.
findtime = 10m

# "maxretry" is the number of failures before a host get banned.
maxretry = 5

# "maxmatches" is the number of matches stored in ticket (resolvable via tag <matches> in actions).
maxmatches = %(maxretry)s

# "backend" specifies the backend used to get files modification.
# Available options are "pyinotify", "gamin", "polling", "systemd" and "auto".
# This option can be overridden in each jail as well.
#
# pyinotify: requires pyinotify (a file alteration monitor) to be installed.
# If pyinotify is not installed, Fail2ban will use auto.
# gamin: requires Gamin (a file alteration monitor) to be installed.
# If Gamin is not installed, Fail2ban will use auto.
# polling: uses a polling algorithm which does not require external libraries.
# systemd: uses systemd python library to access the systemd journal.
# Specifying "logpath" is not valid for this backend.
# See "journalmatch" in the jails associated filter config
# auto: will try to use the following backends, in order:
# pyinotify, gamin, polling.
#
# Note: if systemd backend is chosen as the default but you enable a jail
# for which logs are present only in its own log files, specify some other
# backend for that jail (e.g. polling) and provide empty value for
# journalmatch. See https://github.com/fail2ban/fail2ban/issues/959#issuecomment-74901200
backend = auto

# "usedns" specifies if jails should trust hostnames in logs,
# warn when DNS lookups are performed, or ignore all hostnames in logs
#
# yes: if a hostname is encountered, a DNS lookup will be performed.
# warn: if a hostname is encountered, a DNS lookup will be performed,
# but it will be logged as a warning.
# no: if a hostname is encountered, will not be used for banning,
# but it will be logged as info.
# raw: use raw value (no hostname), allow use it for no-host filters/actions (example user)
usedns = warn

# "logencoding" specifies the encoding of the log files handled by the jail
# This is used to decode the lines from the log file.
# Typical examples: "ascii", "utf-8"
#
# auto: will use the system locale setting
logencoding = auto

# "enabled" enables the jails.
# By default all jails are disabled, and it should stay this way.
# Enable only relevant to your setup jails in your .local or jail.d/*.conf
#
# true: jail will be enabled and log files will get monitored for changes
# false: jail is not enabled
enabled = false


# "mode" defines the mode of the filter (see corresponding filter implementation for more info).
mode = normal

# "filter" defines the filter to use by the jail.
# By default jails have names matching their filter name
#
filter = %(__name__)s[mode=%(mode)s]


#
# ACTIONS
#

# Some options used for actions

# Destination email address used solely for the interpolations in
# jail.{conf,local,d/*} configuration files.
destemail = root@localhost

# Sender email address used solely for some actions
sender = root@<fq-hostname>

# E-mail action. Since 0.8.1 Fail2Ban uses sendmail MTA for the
# mailing. Change mta configuration parameter to mail if you want to
# revert to conventional 'mail'.
mta = sendmail

# Default protocol
protocol = tcp

# Specify chain where jumps would need to be added in ban-actions expecting parameter chain
chain = <known/chain>

# Ports to be banned
# Usually should be overridden in a particular jail
port = 0:65535

# Format of user-agent https://tools.ietf.org/html/rfc7231#section-5.5.3
fail2ban_agent = Fail2Ban/%(fail2ban_version)s

#
# Action shortcuts. To be used to define action parameter

# Default banning action (e.g. iptables, iptables-new,
# iptables-multiport, shorewall, etc) It is used to define
# action_* variables. Can be overridden globally or per
# section within jail.local file
banaction = iptables-multiport
banaction_allports = iptables-allports

# The simplest action to take: ban only
action_ = %(banaction)s[name=%(__name__)s, port="%(port)s", protocol="%(protocol)s", chain="%(chain)s"]

# ban & send an e-mail with whois report to the destemail.
action_mw = %(banaction)s[name=%(__name__)s, port="%(port)s", protocol="%(protocol)s", chain="%(chain)s"]
%(mta)s-whois[name=%(__name__)s, sender="%(sender)s", dest="%(destemail)s", protocol="%(protocol)s", chain="%(chain)s"]

# ban & send an e-mail with whois report and relevant log lines
# to the destemail.
action_mwl = %(banaction)s[name=%(__name__)s, port="%(port)s", protocol="%(protocol)s", chain="%(chain)s"]
%(mta)s-whois-lines[name=%(__name__)s, sender="%(sender)s", dest="%(destemail)s", logpath="%(logpath)s", chain="%(chain)s"]

# See the IMPORTANT note in action.d/xarf-login-attack for when to use this action
#
# ban & send a xarf e-mail to abuse contact of IP address and include relevant log lines
# to the destemail.
action_xarf = %(banaction)s[name=%(__name__)s, port="%(port)s", protocol="%(protocol)s", chain="%(chain)s"]
xarf-login-attack[service=%(__name__)s, sender="%(sender)s", logpath="%(logpath)s", port="%(port)s"]

# ban IP on CloudFlare & send an e-mail with whois report and relevant log lines
# to the destemail.
action_cf_mwl = cloudflare[cfuser="%(cfemail)s", cftoken="%(cfapikey)s"]
%(mta)s-whois-lines[name=%(__name__)s, sender="%(sender)s", dest="%(destemail)s", logpath="%(logpath)s", chain="%(chain)s"]

# Report block via blocklist.de fail2ban reporting service API
#
# See the IMPORTANT note in action.d/blocklist_de.conf for when to use this action.
# Specify expected parameters in file action.d/blocklist_de.local or if the interpolation
# `action_blocklist_de` used for the action, set value of `blocklist_de_apikey`
# in your `jail.local` globally (section [DEFAULT]) or per specific jail section (resp. in
# corresponding jail.d/my-jail.local file).
#
action_blocklist_de = blocklist_de[email="%(sender)s", service=%(filter)s, apikey="%(blocklist_de_apikey)s", agent="%(fail2ban_agent)s"]

# Report ban via badips.com, and use as blacklist
#
# See BadIPsAction docstring in config/action.d/badips.py for
# documentation for this action.
#
# NOTE: This action relies on banaction being present on start and therefore
# should be last action defined for a jail.
#
action_badips = badips.py[category="%(__name__)s", banaction="%(banaction)s", agent="%(fail2ban_agent)s"]
#
# Report ban via badips.com (uses action.d/badips.conf for reporting only)
#
action_badips_report = badips[category="%(__name__)s", agent="%(fail2ban_agent)s"]

# Report ban via abuseipdb.com.
#
# See action.d/abuseipdb.conf for usage example and details.
#
action_abuseipdb = abuseipdb

# Choose default action. To change, just override value of 'action' with the
# interpolation to the chosen action shortcut (e.g. action_mw, action_mwl, etc) in jail.local
# globally (section [DEFAULT]) or per specific section
action = %(action_)s


#
# JAILS
#

#
# SSH servers
#

[sshd]

# To use more aggressive sshd modes set filter parameter "mode" in jail.local:
# normal (default), ddos, extra or aggressive (combines all).
# See "tests/files/logs/sshd" or "filter.d/sshd.conf" for usage example and details.
#mode = normal
port = ssh
logpath = %(sshd_log)s
backend = %(sshd_backend)s


[dropbear]

port = ssh
logpath = %(dropbear_log)s
backend = %(dropbear_backend)s


[selinux-ssh]

port = ssh
logpath = %(auditd_log)s


#
# HTTP servers
#

[apache-auth]

port = http,https
logpath = %(apache_error_log)s


[apache-badbots]
# Ban hosts which agent identifies spammer robots crawling the web
# for email addresses. The mail outputs are buffered.
port = http,https
logpath = %(apache_access_log)s
bantime = 48h
maxretry = 1


[apache-noscript]

port = http,https
logpath = %(apache_error_log)s


[apache-overflows]

port = http,https
logpath = %(apache_error_log)s
maxretry = 2


[apache-nohome]

port = http,https
logpath = %(apache_error_log)s
maxretry = 2


[apache-botsearch]

port = http,https
logpath = %(apache_error_log)s
maxretry = 2


[apache-fakegooglebot]

port = http,https
logpath = %(apache_access_log)s
maxretry = 1
ignorecommand = %(ignorecommands_dir)s/apache-fakegooglebot <ip>


[apache-modsecurity]

port = http,https
logpath = %(apache_error_log)s
maxretry = 2


[apache-shellshock]

port = http,https
logpath = %(apache_error_log)s
maxretry = 1


[openhab-auth]

filter = openhab
action = iptables-allports[name=NoAuthFailures]
logpath = /opt/openhab/logs/request.log


[nginx-http-auth]

port = http,https
logpath = %(nginx_error_log)s

# To use 'nginx-limit-req' jail you should have `ngx_http_limit_req_module`
# and define `limit_req` and `limit_req_zone` as described in nginx documentation
# http://nginx.org/en/docs/http/ngx_http_limit_req_module.html
# or for example see in 'config/filter.d/nginx-limit-req.conf'
[nginx-limit-req]
port = http,https
logpath = %(nginx_error_log)s

[nginx-botsearch]

port = http,https
logpath = %(nginx_error_log)s
maxretry = 2


# Ban attackers that try to use PHP's URL-fopen() functionality
# through GET/POST variables. - Experimental, with more than a year
# of usage in production environments.

[php-url-fopen]

port = http,https
logpath = %(nginx_access_log)s
%(apache_access_log)s


[suhosin]

port = http,https
logpath = %(suhosin_log)s


[lighttpd-auth]
# Same as above for Apache's mod_auth
# It catches wrong authentifications
port = http,https
logpath = %(lighttpd_error_log)s


#
# Webmail and groupware servers
#

[roundcube-auth]

port = http,https
logpath = %(roundcube_errors_log)s
# Use following line in your jail.local if roundcube logs to journal.
#backend = %(syslog_backend)s


[openwebmail]

port = http,https
logpath = /var/log/openwebmail.log


[horde]

port = http,https
logpath = /var/log/horde/horde.log


[groupoffice]

port = http,https
logpath = /home/groupoffice/log/info.log


[sogo-auth]
# Monitor SOGo groupware server
# without proxy this would be:
# port = 20000
port = http,https
logpath = /var/log/sogo/sogo.log


[tine20]

logpath = /var/log/tine20/tine20.log
port = http,https


#
# Web Applications
#
#

[drupal-auth]

port = http,https
logpath = %(syslog_daemon)s
backend = %(syslog_backend)s

[guacamole]

port = http,https
logpath = /var/log/tomcat*/catalina.out

[monit]
#Ban clients brute-forcing the monit gui login
port = 2812
logpath = /var/log/monit
/var/log/monit.log


[webmin-auth]

port = 10000
logpath = %(syslog_authpriv)s
backend = %(syslog_backend)s


[froxlor-auth]

port = http,https
logpath = %(syslog_authpriv)s
backend = %(syslog_backend)s


#
# HTTP Proxy servers
#
#

[squid]

port = 80,443,3128,8080
logpath = /var/log/squid/access.log


[3proxy]

port = 3128
logpath = /var/log/3proxy.log


#
# FTP servers
#


[proftpd]

port = ftp,ftp-data,ftps,ftps-data
logpath = %(proftpd_log)s
backend = %(proftpd_backend)s


[pure-ftpd]

port = ftp,ftp-data,ftps,ftps-data
logpath = %(pureftpd_log)s
backend = %(pureftpd_backend)s


[gssftpd]

port = ftp,ftp-data,ftps,ftps-data
logpath = %(syslog_daemon)s
backend = %(syslog_backend)s


[wuftpd]

port = ftp,ftp-data,ftps,ftps-data
logpath = %(wuftpd_log)s
backend = %(wuftpd_backend)s


[vsftpd]
# or overwrite it in jails.local to be
# logpath = %(syslog_authpriv)s
# if you want to rely on PAM failed login attempts
# vsftpd's failregex should match both of those formats
port = ftp,ftp-data,ftps,ftps-data
logpath = %(vsftpd_log)s


#
# Mail servers
#

# ASSP SMTP Proxy Jail
[assp]

port = smtp,465,submission
logpath = /root/path/to/assp/logs/maillog.txt


[courier-smtp]

port = smtp,465,submission
logpath = %(syslog_mail)s
backend = %(syslog_backend)s


[postfix]
# To use another modes set filter parameter "mode" in jail.local:
mode = more
port = smtp,465,submission
logpath = %(postfix_log)s
backend = %(postfix_backend)s


[postfix-rbl]

filter = postfix[mode=rbl]
port = smtp,465,submission
logpath = %(postfix_log)s
backend = %(postfix_backend)s
maxretry = 1


[sendmail-auth]

port = submission,465,smtp
logpath = %(syslog_mail)s
backend = %(syslog_backend)s


[sendmail-reject]
# To use more aggressive modes set filter parameter "mode" in jail.local:
# normal (default), extra or aggressive
# See "tests/files/logs/sendmail-reject" or "filter.d/sendmail-reject.conf" for usage example and details.
#mode = normal
port = smtp,465,submission
logpath = %(syslog_mail)s
backend = %(syslog_backend)s


[qmail-rbl]

filter = qmail
port = smtp,465,submission
logpath = /service/qmail/log/main/current


# dovecot defaults to logging to the mail syslog facility
# but can be set by syslog_facility in the dovecot configuration.
[dovecot]

port = pop3,pop3s,imap,imaps,submission,465,sieve
logpath = %(dovecot_log)s
backend = %(dovecot_backend)s


[sieve]

port = smtp,465,submission
logpath = %(dovecot_log)s
backend = %(dovecot_backend)s


[solid-pop3d]

port = pop3,pop3s
logpath = %(solidpop3d_log)s


[exim]
# see filter.d/exim.conf for further modes supported from filter:
#mode = normal
port = smtp,465,submission
logpath = %(exim_main_log)s


[exim-spam]

port = smtp,465,submission
logpath = %(exim_main_log)s


[kerio]

port = imap,smtp,imaps,465
logpath = /opt/kerio/mailserver/store/logs/security.log


#
# Mail servers authenticators: might be used for smtp,ftp,imap servers, so
# all relevant ports get banned
#

[courier-auth]

port = smtp,465,submission,imap,imaps,pop3,pop3s
logpath = %(syslog_mail)s
backend = %(syslog_backend)s


[postfix-sasl]

filter = postfix[mode=auth]
port = smtp,465,submission,imap,imaps,pop3,pop3s
# You might consider monitoring /var/log/mail.warn instead if you are
# running postfix since it would provide the same log lines at the
# "warn" level but overall at the smaller filesize.
logpath = %(postfix_log)s
backend = %(postfix_backend)s


[perdition]

port = imap,imaps,pop3,pop3s
logpath = %(syslog_mail)s
backend = %(syslog_backend)s


[squirrelmail]

port = smtp,465,submission,imap,imap2,imaps,pop3,pop3s,http,https,socks
logpath = /var/lib/squirrelmail/prefs/squirrelmail_access_log


[cyrus-imap]

port = imap,imaps
logpath = %(syslog_mail)s
backend = %(syslog_backend)s


[uwimap-auth]

port = imap,imaps
logpath = %(syslog_mail)s
backend = %(syslog_backend)s


#
#
# DNS servers
#


# !!! WARNING !!!
# Since UDP is connection-less protocol, spoofing of IP and imitation
# of illegal actions is way too simple. Thus enabling of this filter
# might provide an easy way for implementing a DoS against a chosen
# victim. See
# http://nion.modprobe.de/blog/archives/690-fail2ban-+-dns-fail.html
# Please DO NOT USE this jail unless you know what you are doing.
#
# IMPORTANT: see filter.d/named-refused for instructions to enable logging
# This jail blocks UDP traffic for DNS requests.
# [named-refused-udp]
#
# filter = named-refused
# port = domain,953
# protocol = udp
# logpath = /var/log/named/security.log

# IMPORTANT: see filter.d/named-refused for instructions to enable logging
# This jail blocks TCP traffic for DNS requests.

[named-refused]

port = domain,953
logpath = /var/log/named/security.log


[nsd]

port = 53
action = %(banaction)s[name=%(__name__)s-tcp, port="%(port)s", protocol="tcp", chain="%(chain)s", actname=%(banaction)s-tcp]
%(banaction)s[name=%(__name__)s-udp, port="%(port)s", protocol="udp", chain="%(chain)s", actname=%(banaction)s-udp]
logpath = /var/log/nsd.log


#
# Miscellaneous
#

[asterisk]

port = 5060,5061
action = %(banaction)s[name=%(__name__)s-tcp, port="%(port)s", protocol="tcp", chain="%(chain)s", actname=%(banaction)s-tcp]
%(banaction)s[name=%(__name__)s-udp, port="%(port)s", protocol="udp", chain="%(chain)s", actname=%(banaction)s-udp]
%(mta)s-whois[name=%(__name__)s, dest="%(destemail)s"]
logpath = /var/log/asterisk/messages
maxretry = 10


[freeswitch]

port = 5060,5061
action = %(banaction)s[name=%(__name__)s-tcp, port="%(port)s", protocol="tcp", chain="%(chain)s", actname=%(banaction)s-tcp]
%(banaction)s[name=%(__name__)s-udp, port="%(port)s", protocol="udp", chain="%(chain)s", actname=%(banaction)s-udp]
%(mta)s-whois[name=%(__name__)s, dest="%(destemail)s"]
logpath = /var/log/freeswitch.log
maxretry = 10


# enable adminlog; it will log to a file inside znc's directory by default.
[znc-adminlog]

port = 6667
logpath = /var/lib/znc/moddata/adminlog/znc.log


# To log wrong MySQL access attempts add to /etc/my.cnf in [mysqld] or
# equivalent section:
# log-warnings = 2
#
# for syslog (daemon facility)
# [mysqld_safe]
# syslog
#
# for own logfile
# [mysqld]
# log-error=/var/log/mysqld.log
[mysqld-auth]

port = 3306
logpath = %(mysql_log)s
backend = %(mysql_backend)s


# Log wrong MongoDB auth (for details see filter 'filter.d/mongodb-auth.conf')
[mongodb-auth]
# change port when running with "--shardsvr" or "--configsvr" runtime operation
port = 27017
logpath = /var/log/mongodb/mongodb.log


# Jail for more extended banning of persistent abusers
# !!! WARNINGS !!!
# 1. Make sure that your loglevel specified in fail2ban.conf/.local
# is not at DEBUG level -- which might then cause fail2ban to fall into
# an infinite loop constantly feeding itself with non-informative lines
# 2. Increase dbpurgeage defined in fail2ban.conf to e.g. 648000 (7.5 days)
# to maintain entries for failed logins for sufficient amount of time
[recidive]

logpath = /var/log/fail2ban.log
banaction = %(banaction_allports)s
bantime = 1w
findtime = 1d


# Generic filter for PAM. Has to be used with action which bans all
# ports such as iptables-allports, shorewall

[pam-generic]
# pam-generic filter can be customized to monitor specific subset of 'tty's
banaction = %(banaction_allports)s
logpath = %(syslog_authpriv)s
backend = %(syslog_backend)s


[xinetd-fail]

banaction = iptables-multiport-log
logpath = %(syslog_daemon)s
backend = %(syslog_backend)s
maxretry = 2


# stunnel - need to set port for this
[stunnel]

logpath = /var/log/stunnel4/stunnel.log


[ejabberd-auth]

port = 5222
logpath = /var/log/ejabberd/ejabberd.log


[counter-strike]

logpath = /opt/cstrike/logs/L[0-9]*.log
# Firewall: http://www.cstrike-planet.com/faq/6
tcpport = 27030,27031,27032,27033,27034,27035,27036,27037,27038,27039
udpport = 1200,27000,27001,27002,27003,27004,27005,27006,27007,27008,27009,27010,27011,27012,27013,27014,27015
action = %(banaction)s[name=%(__name__)s-tcp, port="%(tcpport)s", protocol="tcp", chain="%(chain)s", actname=%(banaction)s-tcp]
%(banaction)s[name=%(__name__)s-udp, port="%(udpport)s", protocol="udp", chain="%(chain)s", actname=%(banaction)s-udp]

[bitwarden]
port = http,https
logpath = /home/*/bwdata/logs/identity/Identity/log.txt

[centreon]
port = http,https
logpath = /var/log/centreon/login.log

# consider low maxretry and a long bantime
# nobody except your own Nagios server should ever probe nrpe
[nagios]

logpath = %(syslog_daemon)s ; nrpe.cfg may define a different log_facility
backend = %(syslog_backend)s
maxretry = 1


[oracleims]
# see "oracleims" filter file for configuration requirement for Oracle IMS v6 and above
logpath = /opt/sun/comms/messaging64/log/mail.log_current
banaction = %(banaction_allports)s

[directadmin]
logpath = /var/log/directadmin/login.log
port = 2222

[portsentry]
logpath = /var/lib/portsentry/portsentry.history
maxretry = 1

[pass2allow-ftp]
# this pass2allow example allows FTP traffic after successful HTTP authentication
port = ftp,ftp-data,ftps,ftps-data
# knocking_url variable must be overridden to some secret value in jail.local
knocking_url = /knocking/
filter = apache-pass[knocking_url="%(knocking_url)s"]
# access log of the website with HTTP auth
logpath = %(apache_access_log)s
blocktype = RETURN
returntype = DROP
action = %(action_)s[blocktype=%(blocktype)s, returntype=%(returntype)s,
actionstart_on_demand=false, actionrepair_on_unban=true]
bantime = 1h
maxretry = 1
findtime = 1


[murmur]
# AKA mumble-server
port = 64738
action = %(banaction)s[name=%(__name__)s-tcp, port="%(port)s", protocol=tcp, chain="%(chain)s", actname=%(banaction)s-tcp]
%(banaction)s[name=%(__name__)s-udp, port="%(port)s", protocol=udp, chain="%(chain)s", actname=%(banaction)s-udp]
logpath = /var/log/mumble-server/mumble-server.log


[screensharingd]
# For Mac OS Screen Sharing Service (VNC)
logpath = /var/log/system.log
logencoding = utf-8

[haproxy-http-auth]
# HAProxy by default doesn't log to file you'll need to set it up to forward
# logs to a syslog server which would then write them to disk.
# See "haproxy-http-auth" filter for a brief cautionary note when setting
# maxretry and findtime.
logpath = /var/log/haproxy.log

[slapd]
port = ldap,ldaps
logpath = /var/log/slapd.log

[domino-smtp]
port = smtp,ssmtp
logpath = /home/domino01/data/IBM_TECHNICAL_SUPPORT/console.log

[phpmyadmin-syslog]
port = http,https
logpath = %(syslog_authpriv)s
backend = %(syslog_backend)s


[zoneminder]
# Zoneminder HTTP/HTTPS web interface auth
# Logs auth failures to apache2 error log
port = http,https
logpath = %(apache_error_log)s

[traefik-auth]
# to use 'traefik-auth' filter you have to configure your Traefik instance,
# see `filter.d/traefik-auth.conf` for details and service example.
port = http,https
logpath = /var/log/traefik/access.log

sshd配置

文件名:sshd_config

1
2
3
4
5
6
7
8
9
10
11
12
13
14
15
16
17
18
19
20
21
22
23
24
25
26
27
28
29
30
31
32
33
34
35
36
37
38
39
40
41
42
43
44
45
46
47
48
49
50
51
52
53
54
55
56
57
58
59
60
61
62
63
64
65
66
67
68
69
70
71
72
73
74
75
76
77
78
79
80
81
82
83
84
85
86
87
88
89
90
91
92
93
94
95
96
97
98
99
100
101
102
103
104
105
106
107
108
109
110
111
112
113
114
115
116
117
118
119
120
121
122
123
124
125
# sshd_config
# $OpenBSD: sshd_config,v 1.103 2018/04/09 20:41:22 tj Exp $

# This is the sshd server system-wide configuration file. See
# sshd_config(5) for more information.

# This sshd was compiled with PATH=/usr/bin:/bin:/usr/sbin:/sbin

# The strategy used for options in the default sshd_config shipped with
# OpenSSH is to specify options with their default value where
# possible, but leave them commented. Uncommented options override the
# default value.

Include /etc/ssh/sshd_config.d/*.conf

Port 20503
#AddressFamily any
#ListenAddress 0.0.0.0
#ListenAddress ::

#HostKey /etc/ssh/ssh_host_rsa_key
#HostKey /etc/ssh/ssh_host_ecdsa_key
#HostKey /etc/ssh/ssh_host_ed25519_key

# Ciphers and keying
#RekeyLimit default none

# Logging
#SyslogFacility AUTH
LogLevel INFO

# Authentication:

LoginGraceTime 20m
PermitRootLogin no
#StrictModes yes
MaxAuthTries 3
#MaxSessions 10

#PubkeyAuthentication yes

# Expect .ssh/authorized_keys2 to be disregarded by default in future.
#AuthorizedKeysFile .ssh/authorized_keys .ssh/authorized_keys2

#AuthorizedPrincipalsFile none

#AuthorizedKeysCommand none
#AuthorizedKeysCommandUser nobody

# For this to work you will also need host keys in /etc/ssh/ssh_known_hosts
#HostbasedAuthentication no
# Change to yes if you don't trust ~/.ssh/known_hosts for
# HostbasedAuthentication
#IgnoreUserKnownHosts no
# Don't read the user's ~/.rhosts and ~/.shosts files
#IgnoreRhosts yes

# To disable tunneled clear text passwords, change to no here!
#PasswordAuthentication yes
#PermitEmptyPasswords no

# Change to yes to enable challenge-response passwords (beware issues with
# some PAM modules and threads)
ChallengeResponseAuthentication no

# Kerberos options
#KerberosAuthentication no
#KerberosOrLocalPasswd yes
#KerberosTicketCleanup yes
#KerberosGetAFSToken no

# GSSAPI options
#GSSAPIAuthentication no
#GSSAPICleanupCredentials yes
#GSSAPIStrictAcceptorCheck yes
#GSSAPIKeyExchange no

# Set this to 'yes' to enable PAM authentication, account processing,
# and session processing. If this is enabled, PAM authentication will
# be allowed through the ChallengeResponseAuthentication and
# PasswordAuthentication. Depending on your PAM configuration,
# PAM authentication via ChallengeResponseAuthentication may bypass
# the setting of "PermitRootLogin without-password".
# If you just want the PAM account and session checks to run without
# PAM authentication, then enable this but set PasswordAuthentication
# and ChallengeResponseAuthentication to 'no'.
UsePAM yes

#AllowAgentForwarding yes
#AllowTcpForwarding yes
#GatewayPorts no
X11Forwarding yes
#X11DisplayOffset 10
#X11UseLocalhost yes
#PermitTTY yes
PrintMotd no
#PrintLastLog yes
#TCPKeepAlive yes
#PermitUserEnvironment no
#Compression delayed
#ClientAliveInterval 0
#ClientAliveCountMax 3
#UseDNS no
#PidFile /var/run/sshd.pid
#MaxStartups 10:30:100
#PermitTunnel no
#ChrootDirectory none
#VersionAddendum none

# no default banner path
#Banner none

# Allow client to pass locale environment variables
AcceptEnv LANG LC_*

# override default of no subsystems
Subsystem sftp /usr/lib/openssh/sftp-server

# Example of overriding settings on a per-user basis
#Match User anoncvs
# X11Forwarding no
# AllowTcpForwarding no
# PermitTTY no
# ForceCommand cvs server
PasswordAuthentication yes

Init核心初始化脚本

文件名:Init.sh

1
2
3
4
5
6
7
8
9
10
11
12
13
14
15
16
17
18
19
20
21
22
23
24
25
26
27
28
29
30
31
32
33
34
35
36
37
38
39
40
41
42
43
44
45
46
47
48
49
50
51
52
53
54
55
56
57
58
59
60
61
62
63
64
65
66
67
68
69
70
71
72
73
74
75
76
77
78
79
80
81
82
83
84
85
86
87
88
89
90
91
92
93
94
95
96
97
98
99
100
101
#!/bin/bash
apt update
apt install fail2ban

# 定义文件和目标路径
declare -A files=(
["jail.conf"]="/etc/fail2ban/jail.conf"
["sshd_config"]="/etc/ssh/sshd_config"
)

# 遍历文件列表并执行复制操作
for file in "${!files[@]}"; do
source_file="./$file"
dest_file="${files[$file]}"

# 检查源文件是否存在
if [ ! -f "$source_file" ]; then
echo "错误:源文件 $source_file 不存在!"
continue
fi

# 检查目标目录是否存在
dest_dir=$(dirname "$dest_file")
if [ ! -d "$dest_dir" ]; then
echo "错误:目标目录 $dest_dir 不存在!"
continue
fi

# 复制文件到目标路径并覆盖
cp -f "$source_file" "$dest_file"
if [ $? -eq 0 ]; then
echo "文件 $source_file 已成功复制到 $dest_file"
else
echo "复制文件 $source_file 时发生错误!"
fi
done


service ssh restart
service fail2ban restart
netstat -tunlp | grep ssh
systemctl status fail2ban


# 用户名
USERNAME="" # 这里输入新添加的用户名
PASSWORD="" # 这里输入相应的密码
# 提示用户输入密码

#echo "请输入新用户的账号:"
#read -s PASSWORD
#echo "请输入新用户的密码:"
#read -s PASSWORD
#echo

# 创建用户
useradd -m "$USERNAME"
if [ $? -ne 0 ]; then
echo "创建用户失败!"
exit 1
fi

# 设置用户密码
echo "$USERNAME:$PASSWORD" | chpasswd
if [ $? -ne 0 ]; then
echo "设置用户密码失败!"
exit 1
fi

# 确保用户属于允许通过 SSH 登录的组(例如 wheel 或 ssh)
usermod -aG sudo "$USERNAME"
# if [ $? -ne 0 ]; then
# echo "添加用户到 wheel 组失败!"
# exit 1
# fi

# 检查 /etc/ssh/sshd_config 是否允许该用户登录
# if grep -q "^DenyUsers" /etc/ssh/sshd_config; then
# sudo sed -i "/^DenyUsers/s/$/ $USERNAME/" /etc/ssh/sshd_config
# else
# echo "DenyUsers $USERNAME" | sudo tee -a /etc/ssh/sshd_config > /dev/null
# fi

# if grep -q "^AllowUsers" /etc/ssh/sshd_config; then
# sudo sed -i "/^AllowUsers/s/$/ $USERNAME/" /etc/ssh/sshd_config
# else
# echo "AllowUsers $USERNAME" | sudo tee -a /etc/ssh/sshd_config > /dev/null
# fi

# 重启 SSH 服务以应用更改
systemctl restart sshd
grep -vE '^(root|halt|sync|shutdown)' /etc/passwd | awk -F: '($7 !~ /nologin|false/) {print $1}'
echo "用户 $USERNAME 已成功添加,并允许通过 SSH 登录。"

if [ $? -ne 0 ]; then
echo "重启 SSH 服务失败!"
exit 1
fi

# echo "用户 $USERNAME 已成功添加,并允许通过 SSH 登录。"

查询服务器防御情况脚本

1
2
3
4
5
6
7
8
9
10
11
12
13
14
15
16
17
18
19
20
21
22
23
24
25
26
27
28
29
30
31
32
33
34
35
sudo grep "Failed password for root" /var/log/auth.log | awk '{print $11}' | sort | uniq -c | sort -nr | more
echo -e '上面是查看使用 root 错误次数\n\n'

read -s -n 1 # -s 选项表示不回显输入的内容,-n 1 表示只读取一个字符

sudo grep "Failed password for ubuntu" /var/log/auth.log | awk '{print $11}' | sort | uniq -c | sort -nr | more
echo -e '上面是查看使用 ubuntu 的错误次数\n\n'

read -s -n 1 # -s 选项表示不回显输入的内容,-n 1 表示只读取一个字符

sudo grep "Failed password for user" /var/log/auth.log | awk '{print $11}' | sort | uniq -c | sort -nr | more
echo -e '上面是查看使用 user 的错误次数\n\n'

read -s -n 1 # -s 选项表示不回显输入的内容,-n 1 表示只读取一个字符

sudo grep "Failed password for invalid user" /var/log/auth.log | awk '{print $13}' | sort | uniq -c | sort -nr | more
echo -e '上面是查看用户名错误的次数\n\n'

read -s -n 1 # -s 选项表示不回显输入的内容,-n 1 表示只读取一个字符

cat /var/log/fail2ban.log
echo -e '上面是查看日志内容\n\n'

read -s -n 1 # -s 选项表示不回显输入的内容,-n 1 表示只读取一个字符

sudo fail2ban-client status sshd
echo -e '上面是查看 fail2ban 的监狱状态\n\n'

read -s -n 1 # -s 选项表示不回显输入的内容,-n 1 表示只读取一个字符

sudo grep -vE '^(root|halt|sync|shutdown)' /etc/passwd | awk -F: '($7 !~ /nologin|false/) {print $1}'
echo -e '上面是查看可以 ssh 登录的用户\n\n'


靶场搭建

DVWA

1
2
docker pull vulnerables/web-dvwa					# 从 Docker Hub 下载镜像到本地
docker run -d -p 80:80 vulnerables/web-dvwa # 80 端口映射容器内部的 80 端口

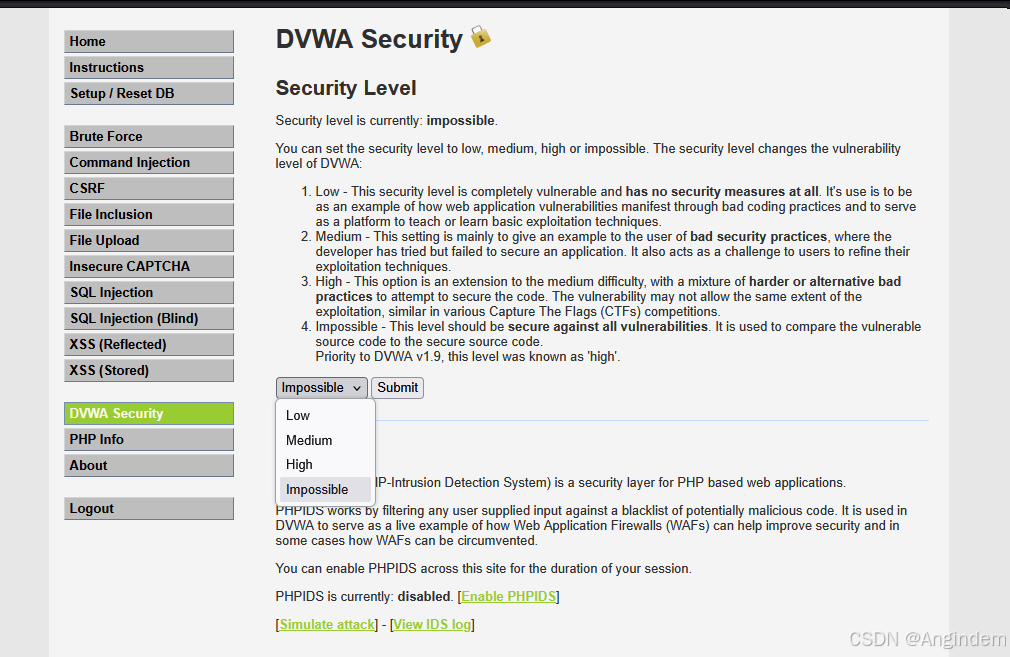
DVWA 的默认安全级别是 impossible (最安全级别),在此级别下,所有用户输入都会经过 htmlspecialchars() 函数处理,将 <> 等特殊字符转义为 HTML 实体,因此浏览器不会将其解析为 HTML 标签,而是直接显示为文本。

你需要将 DVWA 的安全级别从 impossible 改为 Low

  1. 在左侧菜单栏找到 “DVWA Security” (在 Home、Instructions 下面)

  2. 点击进去,将下拉框中的安全级别从 impossible 改为 Low

  3. 点击 Submit 保存设置

  4. 回到 XSS (Reflected) 页面,重新提交你的 payload

LibreTranslate翻译API工具

1
2
3
4
5
6
7
8
9
10
11
12
13
14
15
16
17
18
19
version: '3.8'
services:
libretranslate:
image: libretranslate/libretranslate
container_name: lt_translate
restart: unless-stopped
ports:
- "5353:5000"
environment:
- LT_LOAD_ONLY=en,zh,vi
- LT_UPDATE_MODELS=false
- LT_DATA_DIR=/app/data # 指定数据目录
volumes:
- ./lt_data:/app/data # 挂载到宿主机当前目录的 lt_data 文件夹
- ./model:/home/libretranslate/.local # 翻译模型目录,离线下载模型放置这里无需在线拉取
deploy:
resources:
limits:
memory: 4096M

使用方式

Post

1
http://localhost:5353/translate

请求Body

1
2
3
4
5
{
"q": "这里是翻译文本",
"source": "zh",
"target": "en"
}

启动卡住解决方案

1
2
3
4
5
6
7
8
9
10
11
WARN[0000] /data/libretranslate/docker-compose.yml: the attribute `version` is obsolete, it will be ignored, please remove it to avoid potential confusion 
lt_translate |
lt_translate | ░█░░░▀█▀░█▀▄░█▀▄░█▀▀░▀█▀░█▀▄░█▀█░█▀█░█▀▀░█░░░█▀█░▀█▀░█▀▀
lt_translate | ░█░░░░█░░█▀▄░█▀▄░█▀▀░░█░░█▀▄░█▀█░█░█░▀▀█░█░░░█▀█░░█░░█▀▀
lt_translate | ░▀▀▀░▀▀▀░▀▀░░▀░▀░▀▀▀░░▀░░▀░▀░▀░▀░▀░▀░▀▀▀░▀▀▀░▀░▀░░▀░░▀▀▀
lt_translate | v1.9.6
lt_translate |
lt_translate | Booting...
lt_translate | /app/venv/lib/python3.11/site-packages/requests/__init__.py:109: RequestsDependencyWarning: urllib3 (2.7.0) or chardet (7.6.0)/charset_normalizer (3.5.1) doesn't match a supported version!
lt_translate | warnings.warn(

首次启动需要进行翻译模型的下载,但是离线/网络差的环境,迟迟启动不了。所以改为手动下载模型,并指定目录即可。

  • 修改目录所有权 :使用chown命令将挂载目录的所有权更改为容器内用户的UID(1032)和GID(1032):

    1
    chown -R 1032:1032 ./model
  • 验证权限 :确保目录权限设置为755或更宽松的设置:

    1
    chmod -R 755 ./model

手动下载模型(离线/网络差的环境)

模型下载官网: Argos Open Tech

进入容器(可选,本质上需求的是需要python环境)

1
docker exec -it lt_translate bash

下载模型安装工具包

1
pip install argostranslate -i https://pypi.tuna.tsinghua.edu.cn/simple

安装模型包 : 下载完成后,将模型包放置在 ~/.local/share/argos-translate/packages/ 目录下,然后运行以下命令安装:

1
argospm install <path_to_model_file>

检查语言模型 : 确保已安装了高质量的语言模型包。可以通过以下命令查看已安装的模型:

1
argospm list

1Panel 一键部署

1
2
3
4
5
6
7
8
9
10
11
12
bash -c "$(curl -sSL https://resource.fit2cloud.com/1panel/package/v2/quick_start.sh)" -- \
--non-interactive \
--lang zh \
--install-dir /home/angindem/1panel \
--port 18888 \
--entrance panelEntrance \
--username angindem \
--password 'cTGvMGreQlgL6VZGR' \
--install-docker n \
--docker-mode auto \
--configure-accelerator n \
--replace-daemon-json n

Token开源中转站

1
2
3
4
5
6
7
8
9
# Clone the project
git clone https://github.com/QuantumNous/new-api.git
cd new-api

# Edit docker-compose.yml configuration
nano docker-compose.yml

# Start the service
docker-compose up -d

docker-compose 一键简单环境部署

1
2
3
4
5
6
7
8
9
10
11
12
13
14
15
16
17
18
19
20
21
22
23
24
25
26
27
28
29
30
31
32
33
34
35
services:
postgres:
image: pgvector/pgvector:0.8.5-pg18-bookworm
container_name: postgres-pgvector
restart: unless-stopped
environment:
POSTGRES_USER: ${POSTGRES_USER}
POSTGRES_PASSWORD: ${POSTGRES_PASSWORD}
POSTGRES_DB: ${POSTGRES_DB}
ports:
- "${POSTGRES_PORT}:5432"
volumes:
- ${PWD}/postgres/data:/var/lib/postgresql/data
networks:
- server-test

redis:
image: redis:7.0.12-alpine
container_name: redis
restart: unless-stopped
ports:
- "${REDIS_PORT}:6379"
volumes:
- ${PWD}/redis/data:/data
command: >
redis-server
--requirepass ${REDIS_PASSWORD}
--appendonly yes
networks:
- server-test

networks:
server-test:
name: ${NETWORK_NAME}
driver: bridge

环境变量配置:

1
2
3
4
5
6
7
8
9
10
11
12
13
# .env
# PostgreSQL
POSTGRES_USER=postgres
POSTGRES_PASSWORD=postgres
POSTGRES_DB=testdb
POSTGRES_PORT=5432

# Redis
REDIS_PASSWORD=redis123
REDIS_PORT=6379

# Docker Network
NETWORK_NAME=server-test

觉得不错的话,给点打赏吧 ୧(๑•̀⌄•́๑)૭

微信二维码

wechat pay

支付宝二维码

ali pay

docker一键部署笔记
http://blog.angindem.cn/2026/08/27/Angindem-CSDN博客/186_186/
作者
Angindem
发布于
2026年8月27日
许可协议