创建私有docker镜像仓库+自动化构建镜像


创建私有docker镜像仓库+自动化构建镜像

原创 豆包力荐 已于 2025-12-09 14:34:03 修改 · 粉丝可见 · 244 阅读 · 0 · 0 · 编辑
文章链接:https://blog.csdn.net/hacker_51/article/details/149834884

目录

Docker Registry

DockerRegistry

docker Hub和阿里云都属于公共镜像仓库,涉及到公司隐私问题就需要创建本地私有仓库提供给团队,基于公司内部构建镜像。私有镜像仓有两个选择,一个是 DockerRegistry轻量级私有仓,另一个是 基于 Docker Registry的企业级 Harbor ,Harbor 内置了 Docker Registry,并且集成了企业级管理系统,方便权限分配以及角色管理审查日志等等。 由于 Harbor比较重量级,后续可以研究一下。目前个人来说,我暂时使用轻量级的。

构建镜像仓库

拉取Docker 官方的 registry 仓库镜像。

1
2
# 拉取最新 registry 镜像
docker pull registry:2

启动私有镜像仓库。默认情况下,Registry 会将镜像存储在容器的文件系统中,我们可以通过容器挂载目录,进行持久化存储。

1
2
3
4
5
6
7
# 运行 registry 容器(数据持久化到本地目录)
docker run -d \
--name my-registry \
-p 5000:5000 \
-v /opt/registry/data:/var/lib/registry \
--restart=always \
registry:2
  • 访问地址 : http://<服务器IP>:5000/v2/_catalog (查看镜像列表)

  • 数据存储 : 镜像默认保存在 /opt/registry (通过 -v 挂载)

配置非安全仓库

docker私有仓库默认是基于https传输的,需要在客户端做相关设置不使用https传输。

如果强行推送,就会出现如下错误:

=====================ErrorInfo======================
Error response from daemon:
Get “https://192\.168\.56\.102:5000/v2/“: http: server gave HTTP response to HTTPS client

解决方案:

修改客户端 docker 配置。 注意:是客户端不是服务端私有仓

1
vim /etc/docker/daemon.json #修改客户端docker配置
1
2
3
4
5
6
{
"registry-mirrors": [
...
],
"insecure-registries":["私有仓库IP:5000"]
}

加入 “insecure-registries”:[“私有仓库IP:5000”] 。

重启配置

1
systemctl daemon-reload && systemctl restart docker

测试私有仓库

​推送镜像到私有仓库

1
2
3
4
5
6
7
8
9
# 1. 给本地镜像打标签(格式:私有仓库IP:端口/镜像名)
docker tag nginx:latest localhost:5000/my-nginx

# 2. 推送镜像(如果报错,需配置非安全仓库)
docker push localhost:5000/my-nginx

# 3. 验证是否推送成功
curl http://localhost:5000/v2/_catalog
# 输出: {"repositories":["my-nginx"]}

无证书安全仓库

1、安装httpd-tools工具

1
apt install apache2-utils

2、创建用户密码文件

1
2
mkdir data auth
htpasswd -Bbn test 123456 > ${pwd}/auth/htpasswd

3、创建带用户验证的仓库

1
2
3
4
5
6
7
docker run -d -p 5000:5000 --restart=always --name dregistry \
-v ${pwd}/data:/var/lib/registry \
-v ${pwd}/auth:/auth \
-e "REGISTRY_AUTH=htpasswd" \
-e "REGISTRY_AUTH_HTPASSWD_REALM=Registry Realm" \
-e REGISTRY_AUTH_HTPASSWD_PATH=/auth/htpasswd \
registry:2

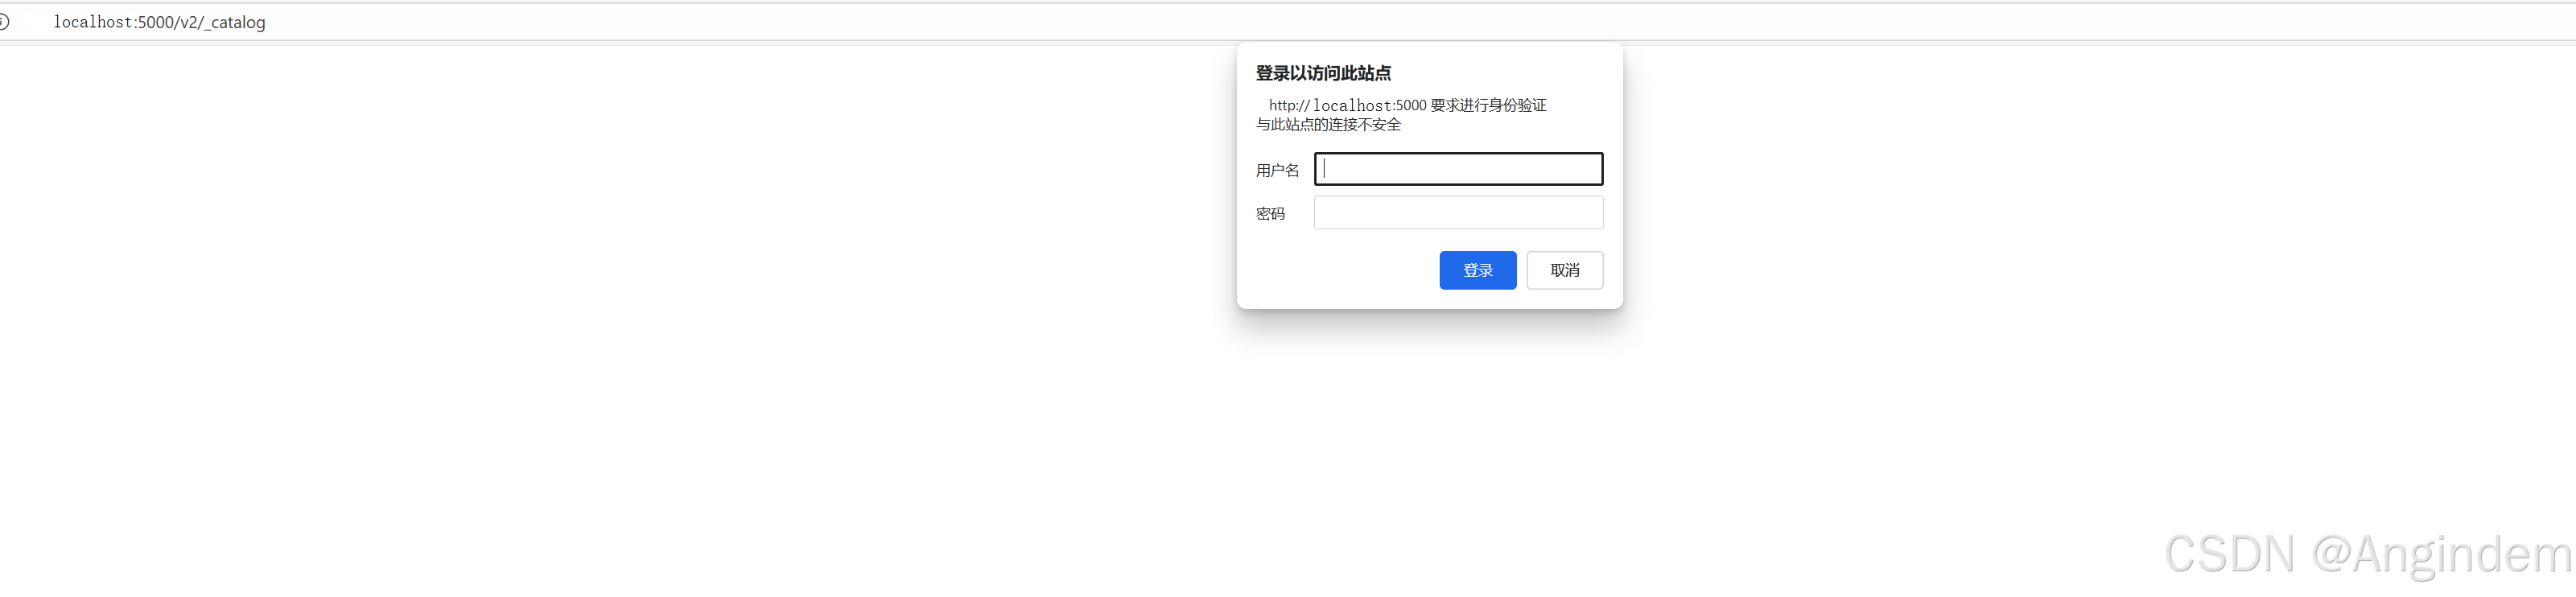
4、浏览器打开 http://192\.168\.0\.101:5000/v2/\_catalog,提示需要用户名密码登录

5、信任域名

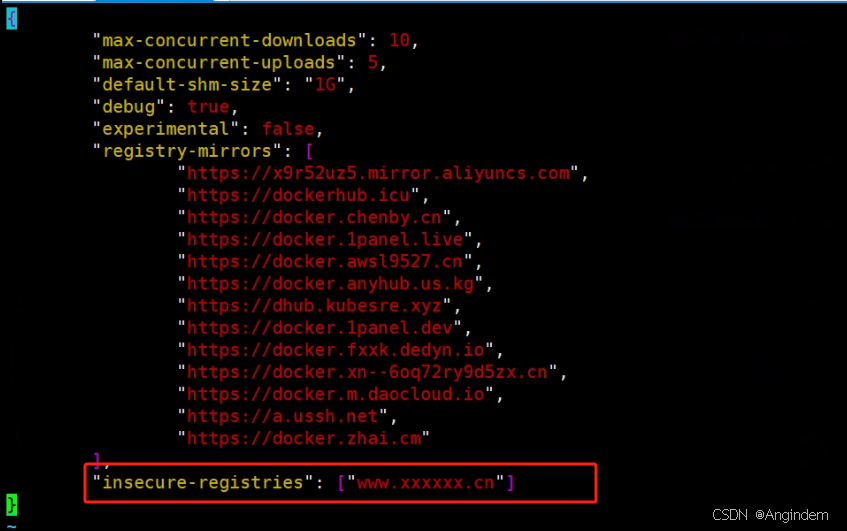
在守护进程中,信任未配置安全证书的域名

1
vim /etc/docker/daemon.json

1
"insecure-registries": ["www.xxxxxx.cn"]

特别注意 :无证书仓库可以没必要做nginx代理,直连使用就可以了,然后dockers守护进程的信任列表元素中应该加上直连的端口,如果是 80 端口,倒是可以忽略,如果不是,就要加上,例如:”insecure-registries”: [“www.xxxxxx.cn:5000”]

6、自动化效果登录成功

有证书安全仓库

创建带证书以及用户验证的仓库

1
2
3
4
5
6
7
8
9
10
11
docker run -d \
--name dregistry \
-p 5000:5000 \
-v ${pwd}/auth:/auth \
-v ${pwd}/certs:/certs\
-v ${pwd}/data:/var/lib/registry \
-e "REGISTRY_AUTH_HTPASSWD_REALM=Registry Realm" \
-e REGISTRY_AUTH_HTPASSWD_PATH=/auth/htpasswd \
-e REGISTRY_HTTP_TLS_CERTIFICATE=/certs/domain.crt \
-e REGISTRY_HTTP_TLS_KEY=/certs/domain.key \
registry:2

配置证书后,我们就可以使用 https 协议访问了。

配置 DockerAuth

由于 Docker Registry 默认情况下,任何人都可以推送和拉取镜像,没有认证机制。及时配置了原装内置的认证机制, 但是所有操作(包括拉取和推送)都需要登录。 我们希望push推送镜像的时候就需要认证,当 pull 拉取的时候无需认证。这时候就需要额外的配置,这里就提到了 Docker Auth 认证机制容器了。

1 、安装 Docker Auth

1
docker pull cesanta/docker_auth

2、配置私有证书密钥

自生成签名证书

1
2
3
4
5
6
# 生成 2048 位 RSA 私钥
openssl genrsa -out auth.key 2048

# 根据私钥生成自签名证书(有效期 365 天)
openssl req -new -x509 -key auth.key -out auth.cert -days 365 \
-subj "/CN=docker-auth"

完成后你得到两个文件:

1
2
auth.key   # 私钥
auth.cert # 证书/公钥

或者使用自己外网申请的证书

3、bcrypt 加密密码

用官方工具 htpasswd:

1
2
3
htpasswd -nB user1
# 输入两次密码后会输出:
user1:$2y$10$xxxxxxxxxxxxxxxxxxxxxxxxxxxxxxxxxxxxxxxxxxxxxxxxxxxxx

4、配置 Docker Auth

创建配置文件 auth_config.yml

1
2
3
4
5
6
7
8
9
10
11
12
13
14
15
16
17
18
19
20
21
server:
addr: ":5001"


token:
issuer: "M1jZfnlUhJbDQ" # 建议执行 openssl rand -base64 32 生成密钥
expiration: 7200
service: "Docker Registry" # ← 新增这一行
certificate: "/config/auth.cert" # 这是容器内目录,不是宿主机目录
key: "/config/auth.key" # 这是容器内目录,不是宿主机目录


users:
"user1":
password: "$2y$10$..." # bcrypt 加密的密码

acl:
- match: {account: "user1"}
actions: ["push", "pull"]
- match: {account: ""}
actions: ["pull"]

5、启动 Docker Auth

开启token的启动方式:

1
2
3
4
5
6
docker run -d -p 5001:5001 \
--name docker_auth \
-v /home/angindem/registry/auth/auth.cert:/config/auth.cert:ro \
-v /home/angindem/registry/auth/auth.key:/config/auth.key:ro \
-v /home/angindem/registry/auth/auth_config.yml:/config/auth_config.yml \
cesanta/docker_auth

6、启动 Registry 并关联 Auth 服务

1
2
3
4
5
6
7
8
9
10
11
12
13
docker run -d -p 5000:5000 \
--name dregistry \
-v ${pwd}/auth:/auth \
-v ${pwd}/certs:/certs\
-v ${pwd}/data:/var/lib/registry \
-e REGISTRY_AUTH=token \
-e REGISTRY_AUTH_TOKEN_REALM=http://<你的IP地址>:5001/auth \
-e REGISTRY_AUTH_TOKEN_SERVICE="Docker Registry" \
-e REGISTRY_AUTH_TOKEN_ISSUER="registry-token-issuer" \
-e REGISTRY_AUTH_TOKEN_ROOTCERTBUNDLE=/auth/auth.cert \
-e REGISTRY_HTTP_TLS_CERTIFICATE=/certs/domain.crt \
-e REGISTRY_HTTP_TLS_KEY=/certs/domain.key \
registry:2

一键部署docker-compose

1
2
3
4
5
6
7
8
9
10
11
12
13
14
15
16
17
18
19
20
21
22
23
24
25
26
27
28
29
version: "3.8"

services:
auth:
image: cesanta/docker_auth:latest
container_name: registry-auth
ports:
- 5001:5001
volumes:
- ${pwd}/certs/domain.pem:/config/domain.pem
- ${pwd}/certs/auth.pem:/config/auth.pem
- ${pwd}/auth/auth_config.yml:/config/auth_config.yml
registry:
image: registry:2
container_name: registry
ports:
- 5000:5000
environment:
- REGISTRY_AUTH=token
- REGISTRY_AUTH_TOKEN_REALM=http://localhost:5001/auth
- REGISTRY_AUTH_TOKEN_SERVICE="Docker Registry"
- REGISTRY_AUTH_TOKEN_ISSUER="3+EhqgNL0ALPv"
- REGISTRY_AUTH_TOKEN_ROOTCERTBUNDLE=/certs/domain.pem
- REGISTRY_HTTP_TLS_CERTIFICATE=/certs/domain.pem
- REGISTRY_HTTP_TLS_KEY=/certs/auth.pem
volumes:
- ${pwd}/auth:/auth
- ${pwd}/certs:/certs
- ${pwd}/data:/var/lib/registry

云上代码托管 Saas 平台

云上代码托管SaaS平台咱们国内就有很多,典型的比如码云 Gitee、腾讯云 CODING、阿里云效 Codeup 等等。

而如果是个人想自己搭建私有化代码托管服务的话,有许多选择。

这里Git 代码仓库平替方案我选择 Forgejo。

主要特性

  • 轻量高效:Forgejo 以简洁、高效著称,能够在低配置的服务器上运行,适合个人或小型团队使用。

  • 易用性:界面友好,并且易于上手和使用。

  • 功能丰富:尽管 Forgejo 是一个轻量级平台,但它并没有牺牲功能。它提供了完整的 Git 仓库管理功能,支持代码审查、问题追踪、Wiki 等,满足团队在软件开发过程中的大部分需求。

  • 开源和社区支持:Forgejo 更加注重社区建设和开源,拥有更高的可定制性,同时 Forgejo 拥有一个活跃的社区,用户可以在这里分享经验、寻求帮助或参与开发。

构建平台

创建docker compose文件,参考文件如下:

1
2
3
4
5
6
7
8
9
10
11
12
13
14
15
16
17
18
19
20
21
22
23
24
25
26
27
28
29
30
31
32
33
34
35
36
37
services:
forgejo:
image: codeberg.org/forgejo/forgejo:10
container_name: forgejo
environment:
- USER_UID=${USER_UID}
- HTTP_PORT=${HTTP_PORT}
- FORGEJO__webhook__ALLOWED_HOST_LIST=${ALLOWED_HOST_LIST}
- FORGEJO__database__DB_TYPE=postgres
- FORGEJO__database__HOST=db:5432
- FORGEJO__database__NAME=forgejo
- FORGEJO__database__USER=forgejo
- FORGEJO__database__PASSWD=forgejo
restart: always
ports:
- "8100:8100"
- "222:22"
volumes:
- /opt/forgejo/forgejo:/data
- /etc/timezone:/etc/timezone:ro
- /etc/localtime:/etc/localtime:ro
depends_on:
- db

db:
image: postgres:17
restart: always
ports:
- "5432:5432"
environment:
- POSTGRES_USER=forgejo
- POSTGRES_PASSWORD=forgejo
- POSTGRES_DB=forgejo

volumes:
- /opt/forgejo/forgejo_db:/var/lib/postgresql/data

USER_UID 和 USER_GID:

USER_UID: 用户的用户 ID(User ID)。

在 Linux 系统中,每个用户都有一个唯一的用户 ID。通过设置 USER_UID,可以确保 Forgejo 容器以正确的用户权限运行,避免权限问题。
USER_GID: 用户的组 ID(Group ID)。

与用户 ID 类似,每个用户组也有一个唯一的组 ID。设置 USER_GID 可以确保容器以正确的用户组权限运行。

通常,USER_UID 和 USER_GID 应该一起使用,以确保容器内的文件和目录权限与宿主机一致。
HTTP_PORT:

HTTP_PORT: 定义了 Forgejo 服务的 HTTP 端口。

在你的配置中,虽然映射了宿主机的 8100 端口到容器的 8100 端口,但 HTTP_PORT 环境变量可能用于内部配置,指定 Forgejo 服务监听的 HTTP 端口。如果未设置,Forgejo 默认会使用其内部的默认端口。

ALLOWED_HOST_LIST:

ALLOWED_HOST_LIST: 定义了允许访问 Forgejo Webhook 的主机列表。

这是一个安全配置,用于限制哪些主机可以触发 Webhook。例如,如果你的 CI/CD 系统需要与 Forgejo 的 Webhook 交互,你可以在这里列出 CI/CD 系统的 IP 地址或域名。

/opt/forgejo/forgejo:/data:用于持久化 Forgejo 的数据,确保数据不会因容器重启而丢失。
/etc/timezone:/etc/timezone:ro 和 /etc/localtime:/etc/localtime:ro:用于确保容器使用与宿主机相同的时区和本地时间设置,避免时间相关的问题。

配置环境变量

方法 1:直接在命令行中设置

在运行 docker-compose 命令之前,可以在命令行中直接设置这些环境变量。例如:

1
2
3
4
export USER_UID=1000
export USER_GID=1000
export HTTP_PORT=8100
export ALLOWED_HOST_LIST="*"

方法 2:使用 .env 文件

创建一个 .env 文件,内容如下:

1
2
3
4
5
USER_UID=1000
USER_GID=1000
HTTP_PORT=8100
# ALLOWED_HOST_LIST=localhost,127.0.0.1
ALLOWED_HOST_LIST=*

注意 USER_GID 使用 docker.sock 的对应用户组ID,执行以下命令获取

1
stat -c "%g" /var/run/docker.sock

执行构建

1
docker compose up -d

配置forgejo

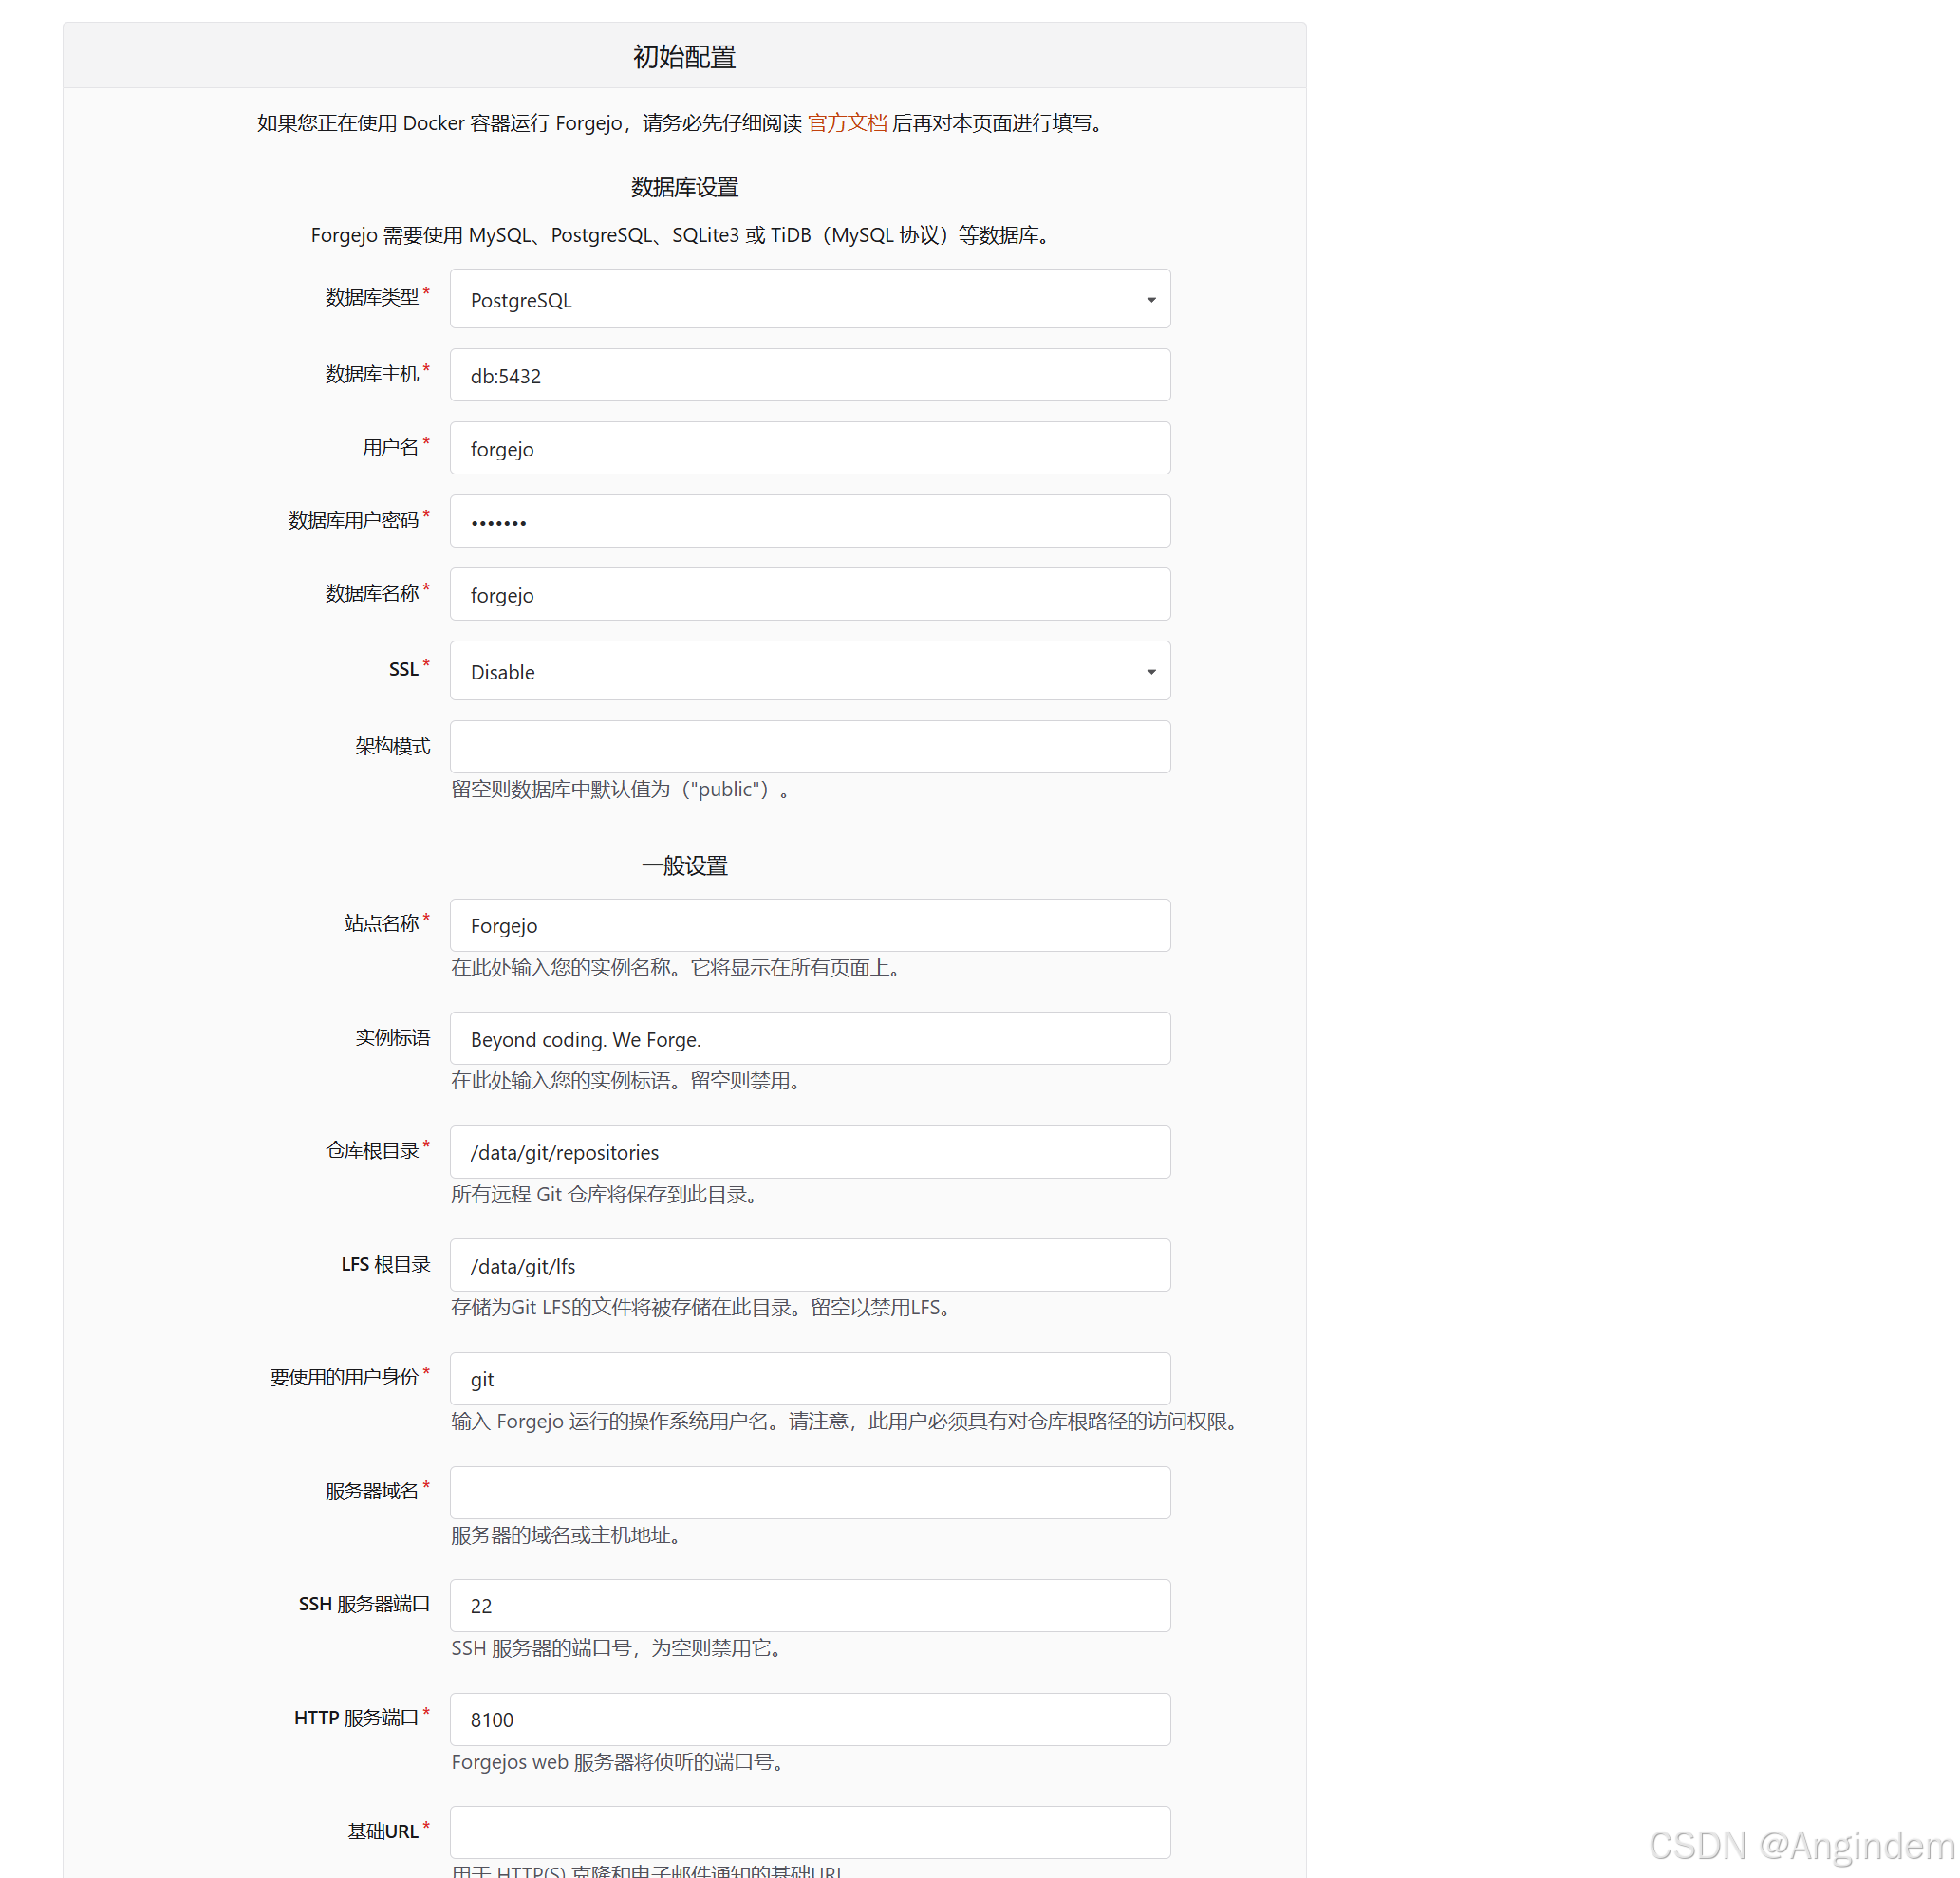
打开web页面 http://localhost:8100/ 进行配置:

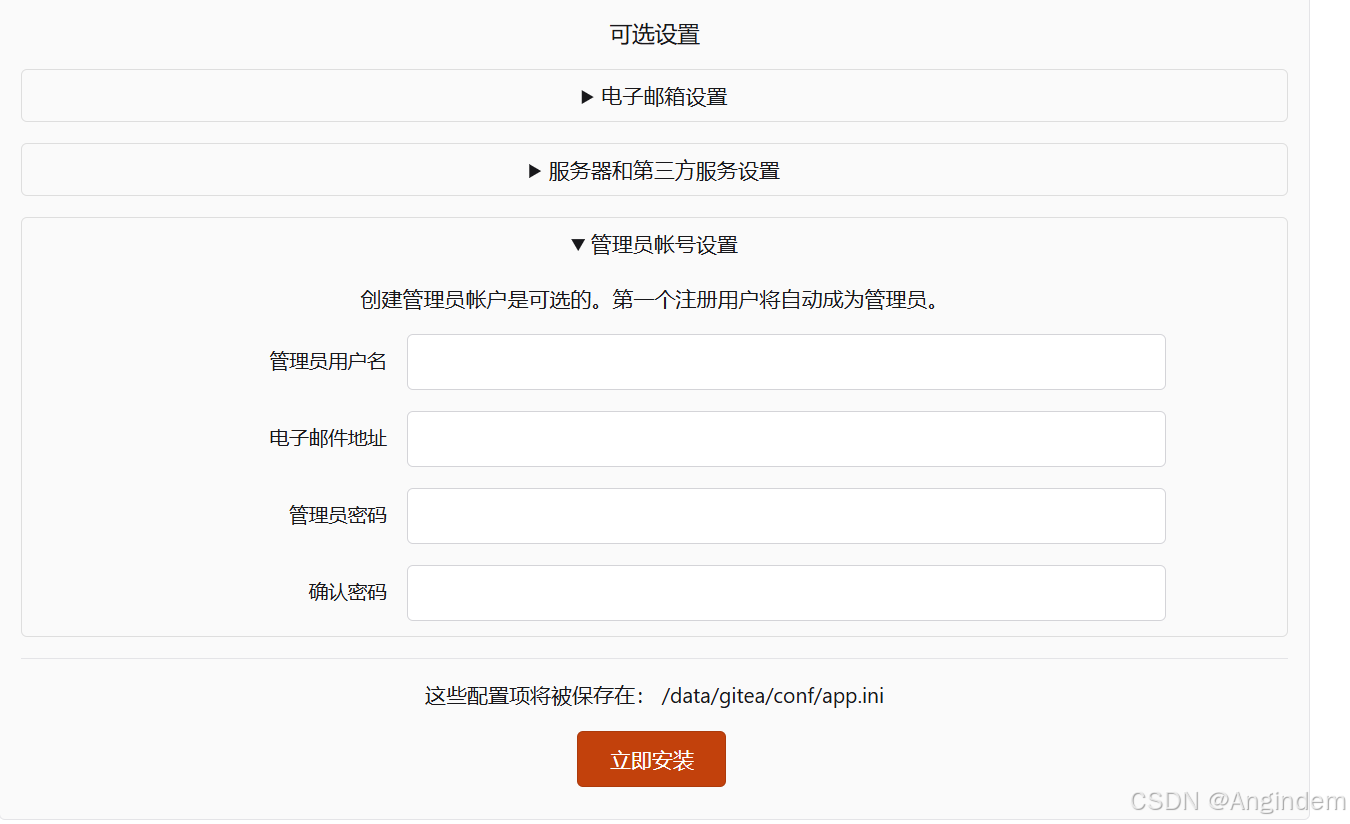
可以设置禁用自主注册并创建一个管理员账号:

CICD 简介

持续集成CI :是需要对开发人员每次的代码提交进行构建测试验证。确定每次提交的代码都是可以正常编译测试通过的。在没有持续集成服务器的时候,我们可以写一个程序来监听版本控制系统的状态,当出现了push动作则触发相应的脚本运行编译构建等步骤。现在有了专业的持续集成服务器后,我们借助持续集成服务器来实现版本控制系统中代码提交触发构建测试等验证步骤。

持续交付CD :是基于持续集成的基础上,将集成后的代码自动化的发布到各个环境中测试(DEV TEST UATSTAG),确定可以发布生产版本。这里我们可以借用制品库实现制品的管理,根据环境类型创建对应的制品库。 一次构建,到处运行。

  1. 开发环境发布:我们可以将开发环境产出的制品部署进行测试,没有问题后上传到测试环境的制品库中。

  2. 测试环境发布:此时通知测试人员可以进行测试环境发布测试,获取测试环境制品库中的制品,发布到测试环境验证。验证通过将制品上传到预生产环境制品库。

  3. 预生产环境发布:获取预生产环境制品,进行部署测试。测试成功后可以将制品上传到生产库中。

  4. 手动部署生产环境。

持续部署 CD: 是基于持续交付的基础上,将在各个环境经过测试的应用自动化部署到生产环境。其实各个环境的发布过程都是一样的。应用发布到生产环境后,我们需要对应用进行健康检查、添加应用的监控项、 应用日志管理。

Forgejo Runner 安装

Forgejo Runner 是 Forgejo 实例的守护进程,用于从 Forgejo 实例获取工作流、执行它们,并将日志和执行结果发送回 Forgejo 实例。

1、runner 容器安装

运行 Docker 镜像的一种方法是通过 Docker Compose。这样做,作为根,首先准备一个 data 具有非 root 权限的目录(在这种情况下,我们选择 1001:1001 ) :

1
2
3
4
5
6
7
8
9
10
11
12
13
14
#!/usr/bin/env bash

set -e

mkdir -p data
touch data/.runner
mkdir -p data/.cache

chown -R 1001:1001 data/.runner
chown -R 1001:1001 data/.cache
chmod 775 data/.runner
chmod 775 data/.cache
chmod g+s data/.runner
chmod g+s data/.cache

定义以下 docker-compose.yml :

1
2
3
4
5
6
7
8
9
10
11
12
13
14
15
16
17
18
19
20
21
22
23
24
25
26
27
28
29
30
31
32
version: "3.9"

services:
forgejo_runner:
image: code.forgejo.org/forgejo/runner:7.0.0
container_name: ${CONTAINER_NAME:-forgejo-runner}
restart: always
user: "1001:1001"
environment:
- FORGEJO_INSTANCE_URL=${FORGEJO_INSTANCE_URL}
- RUNNER_REGISTRATION_TOKEN=${RUNNER_REGISTRATION_TOKEN}
- RUNNER_NAME=${RUNNER_NAME:-default-runner}
- RUNNER_LABELS=${RUNNER_LABELS:-ubuntu-latest}
command: >
/bin/sh -c '
cd /data &&
if [ ! -s .runner ]; then
echo ">>> Registering runner..." &&
forgejo-runner register --no-interactive \
--instance ${FORGEJO_INSTANCE_URL} \
--token ${RUNNER_REGISTRATION_TOKEN} \
--name ${RUNNER_NAME} \
--labels ${RUNNER_LABELS} &&
forgejo-runner generate-config > config.yml;
fi &&
echo ">>> Starting daemon..." &&
forgejo-runner --config config.yml daemon
'
volumes:
- ./data:/data
- /etc/docker/daemon.json:/etc/docker/daemon.json:ro # 映射宿主机配置
- /var/run/docker.sock:/var/run/docker.sock # 关键

创建  .env

1
2
3
4
5
FORGEJO_INSTANCE_URL=<你的代码仓平台域名,例如:http://xxx.xxx.com/>
RUNNER_REGISTRATION_TOKEN=<注册密钥,例如:v2gqRjJ8R>
RUNNER_NAME=<运行器名称,例如:angindem-runner>
# RUNNER_LABELS 是指定的运行环境镜像 配合 run on
RUNNER_LABELS=ubuntu-latest:docker://gitea/runner-images:ubuntu-latest

请注意,在安装的Docker中 docker-compose 不是一个单独的命令,应该以 docker compose启动

对于RUNNER_LABELS最好使用一些预装具备git,docker 等工具环境的镜像比较好。

看个人需求来挑选吧。以下是我所了解收集到的。后续还会更新。

1
2
3
4
ubuntu-latest:docker://gitea/runner-images:ubuntu-latest
ubuntu-24.04:docker://gitea/runner-images:ubuntu-24.04
ubuntu-22.04:docker://gitea/runner-images:ubuntu-22.04
ubuntu-20.04:docker://gitea/runner-images:ubuntu-20.04

启动后,我的初始化会生成 config.yml 文件,在 config.yml 中还需要指定一下 docker.scok 守护进程,我的docker-compose 使用的是 宿主机的 ,所以 当我们创建了 run on 所指定的运行环境后,也需要指定一下docker 的守护进程。也有可能如果你的 run on 所指定的环境已经有了 docker 守护进程,那么可以默认。因为我这里使用的是 ubuntu 所以需要修改一下 config.yml 指定一下。

1
2
3
4
5
6
7
8
9
10
11
12
13
14
15
16
17
18
19
20
21
22
23
24
25
26
27
28
29
30
31
32
33
34
35
container:
# Specifies the network to which the container will connect.
# Could be host, bridge or the name of a custom network.
# If it's empty, create a network automatically.
network: ""
# Whether to create networks with IPv6 enabled. Requires the Docker daemon to be set up accordingly.
# Only takes effect if "network" is set to "".
enable_ipv6: false
# Whether to use privileged mode or not when launching task containers (privileged mode is required for Docker-in-Docker).
privileged: true # 开启特权模式(这里如果是 DinD 那么开一下比较好,如果不是开不开都无所谓)
# And other options to be used when the container is started (eg, --volume /etc/ssl/certs:/etc/ssl/certs:ro).
options:
# The parent directory of a job's working directory.
# If it's empty, /workspace will be used.
workdir_parent:
# Volumes (including bind mounts) can be mounted to containers. Glob syntax is supported, see https://github.com/gobwas/glob
# You can specify multiple volumes. If the sequence is empty, no volumes can be mounted.
# For example, if you only allow containers to mount the `data` volume and all the json files in `/src`, you should change the config to:
# valid_volumes:
# - data
# - /etc/ssl/certs
# If you want to allow any volume, please use the following configuration:
# valid_volumes:
# - '**'
valid_volumes:
- "/var/run/docker.sock:/var/run/docker.sock" # 挂载映射
# overrides the docker client host with the specified one.
# If "-" or "", an available docker host will automatically be found.
# If "automount", an available docker host will automatically be found and mounted in the job container (e.g. /var/run/docker.sock).
# Otherwise the specified docker host will be used and an error will be returned if it doesn't work.
docker_host: "unix:///var/run/docker.sock" # 指定使用宿主机守护进程
# Pull docker image(s) even if already present
force_pull: false
# Rebuild local docker image(s) even if already present
force_rebuild: false

随后执行 docker compose down 然后 docker compose up -d 重启就可以了。

提供了更多的 docker come 示例来演示如何安装 OCI 映像以成功运行工作流。

2、标准注册forgejo-runner(这里参考学习就行了,我上面以及做好了一键注册初始化)

Forgejo runner 需要连接到一个 Forgejo 实例,并且必须在这样做之前进行注册。它将允许它读取存储库并发回信息到 Forgejo 例如日志或状态。

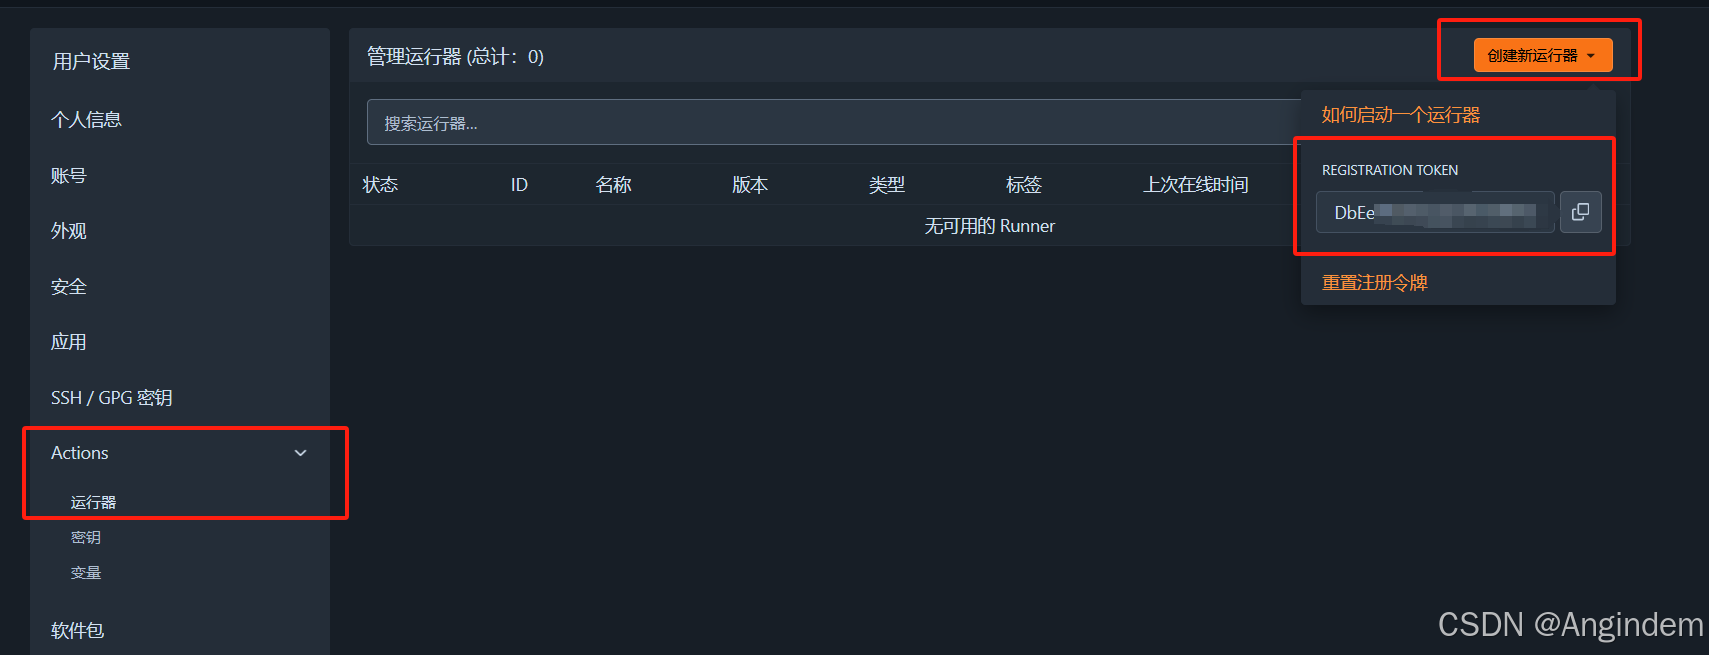
需要一种特殊的令牌,可以通过 “Create new runner” 按钮:

  • /admin/actions/runners 接受来自所有存储库的工作流程。

  • /org/{org}/settings/actions/runners 接受组织内所有存储库的工作流程。

  • /user/settings/actions/runners 接受来自登录用户所有存储库的工作流程

  • /{owner}/{repository}/settings/actions/runners 接受来自单个存储库的工作流程。

要注册 runner,执行 forgejo-runner register 填写信息。

1
forgejo-runner register

随后填写注册,例如:

1
2
3
4
5
6
7
8
9
10
11
12
13
INFO Registering runner, arch=arm64, os=linux, version=v4.0.0.
WARN Runner in user-mode.
INFO Enter the Forgejo instance URL (for example, https://next.forgejo.org/):
https://code.forgejo.org/
INFO Enter the runner token:
6om01axzegBu98YCpsFtda4Go2DuJe7BEepzz2F3HY
INFO Enter the runner name (if set empty, use hostname: runner-host):
my-forgejo-runner
INFO Enter the runner labels, leave blank to use the default labels (comma-separated, for example, ubuntu-20.04:docker://node:20-bookworm,ubuntu-18.04:docker://node:20-bookworm):

INFO Registering runner, name=my-forgejo-runner, instance=https://code.forgejo.org/, labels=[docker:docker://node:20-bullseye].
DEBU Successfully pinged the Forgejo instance server
INFO Runner registered successfully.

注意:

INFO Enter the runner labels, leave blank to use the default labels (comma-separated, for example, ubuntu-20.04:docker://node:20-bookworm,ubuntu-18.04:docker://node:20-bookworm):

这里需要输入对应的运行器标签。后面对应执行自动化构建的 runs-on 有关。 同时当要决定使用哪些runner标签, 请参阅选择标签。

对应的 labels 最好引用 gitea 那些预装有 docker ,git 等环境工具的镜像

参考如下:

ubuntu-latest:docker://gitea/runner-images:ubuntu-latest
ubuntu-24.04:docker://gitea/runner-images:ubuntu-24.04
ubuntu-22.04:docker://gitea/runner-images:ubuntu-22.04
ubuntu-20.04:docker://gitea/runner-images:ubuntu-20.04

注册成功后会自动创建一个 .runner

当前目录中的查看文件类似以下信息:

1
2
3
4
5
6
7
8
9
{
"WARNING": "This file is automatically generated by act-runner. Do not edit it manually unless you know what you are doing. Removing this file will cause act runner to re-register as a new runner.",
"id": 42,
"uuid": "d2ax6368-9c20-4dy0-9a5a-e09c53854zb5",
"name": "my-forgejo-runner",
"token": "864e6019009e1635d98adf3935b305d32494d42a",
"address": "https://code.forgejo.org/",
"labels": ["docker:docker://node:20-bullseye"]
}

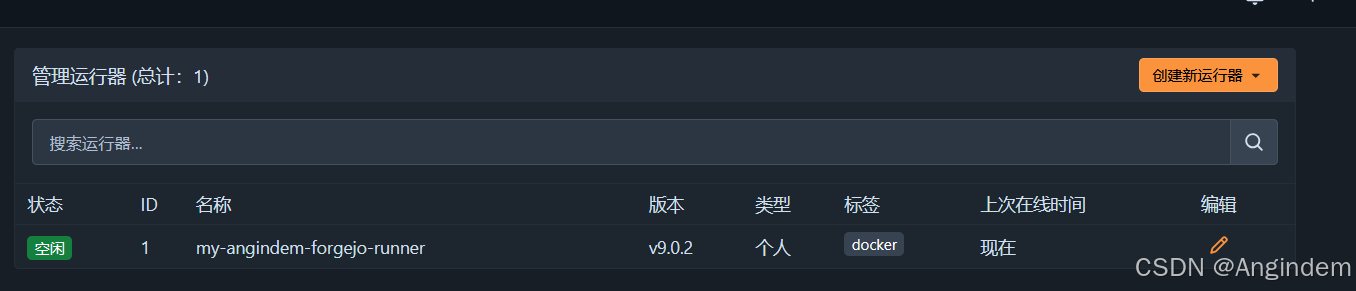
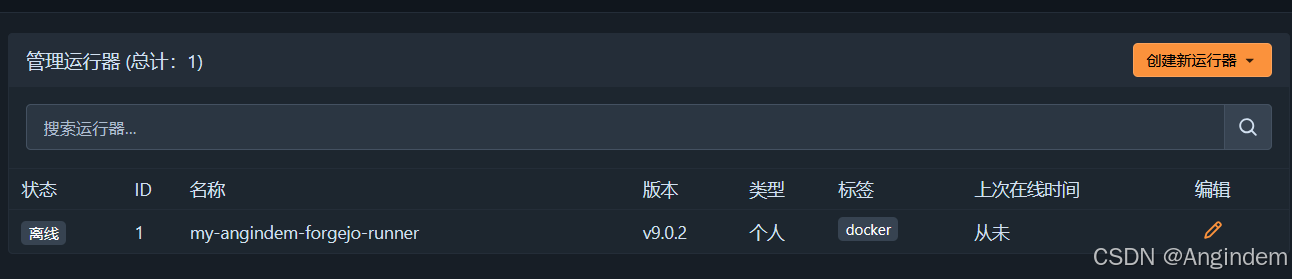
同时查看我们的Forgejo Actions。可以看到注册成功。

相同的令牌可以多次用于注册任意数量的runner,彼此独立。

配置

使用以下命令来显示运行器的默认配置

1
forgejo-runner generate-config

提取出默认配置并存储在名为 “config.yml” 的文件中。

1
forgejo-runner generate-config > config.yml

得到以下默认配置:

1
2
3
4
5
6
7
8
9
10
11
12
13
14
15
16
17
18
19
20
21
22
23
24
25
26
27
28
29
30
31
32
33
34
35
36
37
38
39
40
41
42
43
44
45
46
47
48
49
50
51
52
53
54
55
56
57
58
59
60
61
62
63
64
65
66
67
68
69
70
71
72
73
74
75
76
77
78
79
80
81
82
83
84
85
86
87
88
89
90
91
92
93
94
95
96
97
98
99
100
101
102
103
104
105
106
107
108
109
110
111
112
113
114
115
116
117
118
119
120
121
122
123
124
125
126
127
128
129
130
131
132
133
134
135
136
137
138
139
140
141
142
143
144
145
146
147
148
149
150
151
152
153
154
155
156
157
158
159
160
161
162
163
164
165
166
167
168
169
170
171
172
173
174
175
176
177
178
179
180
181
182
183
184
185
186
187
188
# Example configuration file, it's safe to copy this as the default config file without any modification.

# You don't have to copy this file to your instance,
# just run `forgejo-runner generate-config > config.yaml` to generate a config file.

log:
# The level of logging, can be trace, debug, info, warn, error, fatal
level: info
# The level of logging for jobs, can be trace, debug, info, earn, error, fatal
job_level: info

runner:
# Where to store the registration result.
file: .runner
# Execute how many tasks concurrently at the same time.
capacity: 1
# Extra environment variables to run jobs.
envs:
A_TEST_ENV_NAME_1: a_test_env_value_1
A_TEST_ENV_NAME_2: a_test_env_value_2
# Extra environment variables to run jobs from a file.
# It will be ignored if it's empty or the file doesn't exist.
env_file: .env
# The timeout for a job to be finished.
# Please note that the Forgejo instance also has a timeout (3h by default) for the job.
# So the job could be stopped by the Forgejo instance if it's timeout is shorter than this.
timeout: 3h
# The timeout for the runner to wait for running jobs to finish when
# shutting down because a TERM or INT signal has been received. Any
# running jobs that haven't finished after this timeout will be
# cancelled.
# If unset or zero the jobs will be cancelled immediately.
shutdown_timeout: 3h
# Whether skip verifying the TLS certificate of the instance.
insecure: false
# The timeout for fetching the job from the Forgejo instance.
fetch_timeout: 5s
# The interval for fetching the job from the Forgejo instance.
fetch_interval: 2s
# The interval for reporting the job status and logs to the Forgejo instance.
report_interval: 1s
# The labels of a runner are used to determine which jobs the runner can run, and how to run them.
# Like: ["macos-arm64:host", "ubuntu-latest:docker://node:20-bookworm", "ubuntu-22.04:docker://node:20-bookworm"]
# If it's empty when registering, it will ask for inputting labels.
# If it's empty when executing the `daemon`, it will use labels in the `.runner` file.
labels: []

cache:
#
# When enabled, workflows will be given the ACTIONS_CACHE_URL environment variable
# used by the https://code.forgejo.org/actions/cache action. The server at this
# URL must implement a compliant REST API and it must also be reachable from
# the container or host running the workflows.
#
# See also https://forgejo.org/docs/next/user/actions/advanced-features/#cache
#
# When it is not enabled, none of the following options apply.
#
# It works as follows:
#
# - the workflow is given a one time use ACTIONS_CACHE_URL
# - a cache proxy listens to ACTIONS_CACHE_URL
# - the cache proxy securely communicates with the cache server using
# a shared secret
#
enabled: true
#
#######################################################################
#
# Only used for the internal cache server.
#
# If external_server is not set, the Forgejo runner will spawn a
# cache server that will be used by the cache proxy.
#
#######################################################################
#
# The port bound by the internal cache server.
# 0 means to use a random available port.
#
port: 0
#
# The directory to store the cache data.
#
# If empty, the cache data will be stored in $HOME/.cache/actcache.
#
dir: ""
#
#######################################################################
#
# Only used for the external cache server.
#
# If external_server is set, the internal cache server is not
# spawned.
#
#######################################################################
#
# The URL of the cache server. The URL should generally end with
# "/". The cache proxy will forward requests to the external
# server. The requests are authenticated with the "secret" that is
# shared with the external server.
#
external_server: ""
#
#######################################################################
#
# Common to the internal and external cache server
#
#######################################################################
#
# The shared cache secret used to secure the communications between
# the cache proxy and the cache server.
#
# If empty, it will be generated to a new secret automatically when
# the server starts and it will stay the same until it restarts.
#
# Every time the secret is modified, all cache entries that were
# created with it are invalidated. In order to ensure that the cache
# content is reused when the runner restarts, this secret must be
# set, for instance with the output of openssl rand -hex 40.
#
secret: ""
#
# The IP or hostname (195.84.20.30 or example.com) to use when constructing
# ACTIONS_CACHE_URL which is the URL of the cache proxy.
#
# If empty it will be detected automatically.
#
# If the containers or host running the workflows reside on a
# different network than the Forgejo runner (for instance when the
# docker server used to create containers is not running on the same
# host as the Forgejo runner), it may be impossible to figure that
# out automatically. In that case you can specifify which IP or
# hostname to use to reach the internal cache server created by the
# Forgejo runner.
#
host: ""
#
# The port bound by the internal cache proxy.
# 0 means to use a random available port.
#
proxy_port: 0
#
# Overrides the ACTIONS_CACHE_URL passed to workflow
# containers. This should only be used if the runner host is not
# reachable from the workflow containers, and requires further
# setup.
#
actions_cache_url_override: ""

container:
# Specifies the network to which the container will connect.
# Could be host, bridge or the name of a custom network.
# If it's empty, create a network automatically.
network: ""
# Whether to create networks with IPv6 enabled. Requires the Docker daemon to be set up accordingly.
# Only takes effect if "network" is set to "".
enable_ipv6: false
# Whether to use privileged mode or not when launching task containers (privileged mode is required for Docker-in-Docker).
privileged: false
# And other options to be used when the container is started (eg, --volume /etc/ssl/certs:/etc/ssl/certs:ro).
options:
# The parent directory of a job's working directory.
# If it's empty, /workspace will be used.
workdir_parent:
# Volumes (including bind mounts) can be mounted to containers. Glob syntax is supported, see https://github.com/gobwas/glob
# You can specify multiple volumes. If the sequence is empty, no volumes can be mounted.
# For example, if you only allow containers to mount the `data` volume and all the json files in `/src`, you should change the config to:
# valid_volumes:
# - data
# - /etc/ssl/certs
# If you want to allow any volume, please use the following configuration:
# valid_volumes:
# - '**'
valid_volumes: []
# overrides the docker client host with the specified one.
# If "-" or "", an available docker host will automatically be found.
# If "automount", an available docker host will automatically be found and mounted in the job container (e.g. /var/run/docker.sock).
# Otherwise the specified docker host will be used and an error will be returned if it doesn't work.
docker_host: "-"
# Pull docker image(s) even if already present
force_pull: false
# Rebuild local docker image(s) even if already present
force_rebuild: false

host:
# The parent directory of a job's working directory.
# If it's empty, $HOME/.cache/act/ will be used.
workdir_parent:

注意: container.docker_host = “automount” 仅适用于 forgejo-runner 版本 5.0.3 及以上。对于版本小于 5.0.3 的 forgejo-runner,必须将其明确设置为空字符串。
注意: container.force_rebuild 仅适用于 forgejo-runner 版本 6.1.0 及以上。对于版本小于 6.1.0 的 forgejo-runner,其默认值为 false。

具体配置,根据自己需求进行配置即可。

缓存配置

有一些操作,例如 https://data\.forgejo\.org/actions/cachehttps://data\.forgejo\.org/actions/setup\-go ,可以与 Forgejo runner 保存和恢复常用文件,如 编译依赖关系。

这些文件以压缩的 tar 归档文件形式存储,当 job 启动时会进行获取, job 完成时则会进行保存。
如果该机器配备有高速硬盘,那么在 job 开始时将缓存数据上传至该机器,可能会显著降低下载和重建依赖项所需的带宽。
如果运行 Forgejo 运行程序的机器硬盘读取速度较慢,但 CPU 和带宽充足的话,那么可能最好不要启用缓存,因为这可能会延长执行时间。

CI_CD 流水线(管道)

参考官方文档: Forgejo Actions | Quick start guide | Forgejo – Beyond coding. We forge.

快速入门

添加作业

创建一个文件 .forgejo/workflows/demo.yaml 添加以下代码:

1
2
3
4
5
6
on: [push]
jobs:
test:
runs-on: docker
steps:
- run: echo All good!

此文件描述一个工作流。工作流将触发 push 事件。工作流包含一个 job ,称为 test . .这项工作将 run on 带有 docker 标签的runner. .如果runner(从第2步开始)有不同的标签,应该在这里指定它。因 test 工作有一个 steps ,这是简单地说 run 命令 echo All good!

代码校验

代码校验 操作是在 CI 工作流中执行某些操作的可重用过程。在许多方面,动作与函数相似。为了将存储库的内容导入工作流,我们将使用 actions/checkout 行动。操作只是一个存储库,里面有一些特殊文件。有关如何使用它们以及如何制作自己的操作指南的更多信息, 请查看操作指南。

添加以下几行到 - run: echo All good! 下面 。demo.yaml 文件:

1
2
- uses: actions/checkout@v4
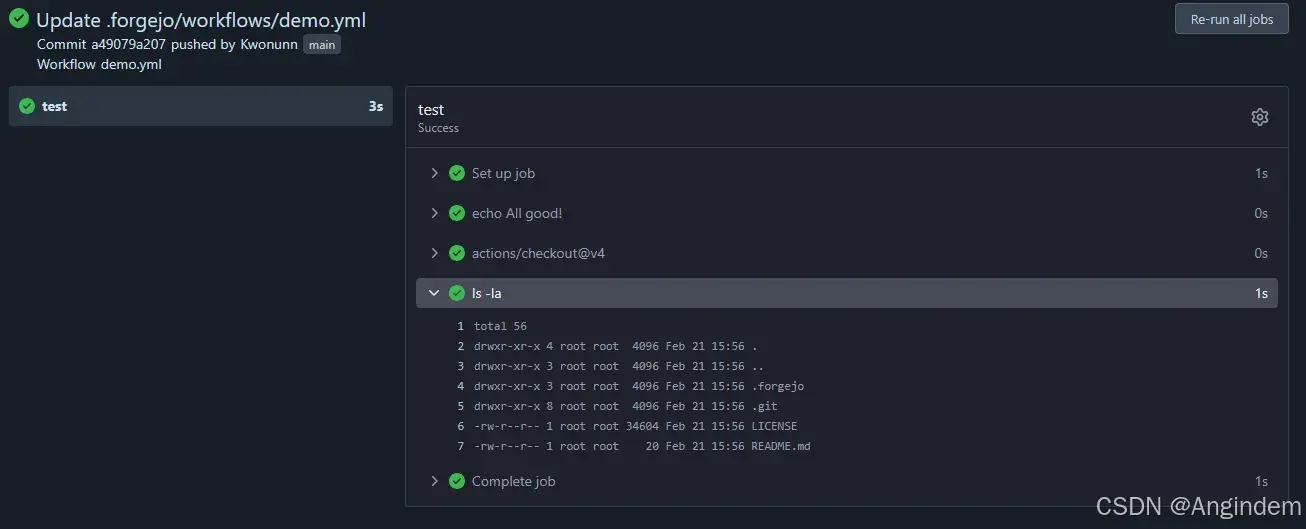
- run: ls -la

这里我们增加了两个步骤。第一步 uses 行动 actions/checkout 具体 v4 . .我们没有传递任何参数,因为我们只想查看此存储库。第二步简单 runs 命令 ls -la 向我们展示工作目录的内容。

提交这些更改并将其推送到存储库的主分支。

Forgejo Actions | 使用动作

使用actions

例如,要查看存储库的内容,您可以使用 actions/checkout 行动。要使用它,请在工作流中添加以下步骤到作业:

1
2
- name: Check out the repository
uses: https://data.forgejo.org/actions/checkout@v4

这说明这一步骤 uses 行动 https://data.forgejo.org/actions/checkout , 版本 v4 . .

你也可以指定一个动作,如 uses: actions/checkout@v4 . .在这种情况下,runner 将前缀为 DEFAULT_ACTIONS_URL 并像正常一样进行。因 DEFAULT_ACTIONS_URLhttps://data.forgejo.org/ 默认情况下,但可以由实例管理员更改。因此 ,强烈建议使用完全限定的 URL。 在本指南中,我们将使用较短的符号来简洁。

您还可以从本地目录而不是远程存储库加载操作。 这称为本地actions。

行动投入

Action 可以有参数,称为 inputs 。您通常可以读取一个操作在其README中具有哪些输入。要指定操作的输入,您可以使用 with 键像这样:

1
2
3
4
5
6
- name: Check out the repository
uses: actions/checkout@v4
with:
ref: my-feature-branch
path: some/subdirectory
show-progress: true

动作依赖关系

由于 Actions 只是在 CI 工作流中运行的脚本,因此它们通常具有依赖关系。例如, actions/checkout 操作取决于 NodeJS。如果不存在,行动将失败。使用非标准容器映像时,检查所需的依赖关系是否存在非常重要。如果它们不是,你可以尝试这些修复:

  • 查找已预安装依赖项的容器映像。

  • during 使用包管理器在工作流期间安装依赖项。

  • 找到一个没有依赖关系的替代操作。

本地actions

如果一个actions 是uses 语句开始 ./ 它将从指定的本地目录加载,而不是从远程存储库克隆。操作目录的布局和内容将与远程操作完全相同。

看看例子。

创建自己的actions

创建自己的actions是相当简单的。一个actions实际上只是一个目录。 在action.yml 里面。行动有三种类型, node , dockercomposite

这些类型的行动在下面进一步解释。

Tip: 提示:当首先开发一个操作时, local action 将其加载为用于测试的本地操作是有用的。

actions.yml

actions.yml file 包含该操作的所有元数据。它决定名称、描述、输入、输出以及如何运行该操作。

看看这个简单的例子:

1
2
3
4
5
6
7
8
9
10
11
12
13
14
15
name: 'Example Action'
author: 'Me, I wrote it'
description: |
A simple action that just takes some input and writes it to a file.

inputs:
message:
description: 'The message to be stored'
default: 'default message'

outputs:
time:
description: 'The time when the action was run'

runs: ...

内容 runs 键决定它是什么类型的动作。

node 行动

Node 操作使用 NodeJS 执行。NodeJS not 不会自动安装,因此,如果容器映像中不存在,则操作将失败。

Node 操作在 Oracle 中具有以下信息: runs 键:

1
2
3
runs:
using: 'node20'
main: 'index.js'

main 键决定执行的切入点。

有关编写节点操作的更多信息,请检查 GitHub 文档。 请记住,GitHub 和 Forgejo 之间的某些细节有所不同。

docker 行动

Docker 操作使用容器引擎执行。它们只能用于提供一个的跑步者,如Docker或Podman。

Docker 操作在 Docker 中具有以下信息 runs 键:

1
2
3
4
5
runs:
using: 'docker'
image: 'Containerfile'
args:
- ${{ inputs.message }} # This also needs to be defined in the inputs section above.

image 关键点在 Containerfile 应该用它来构建将要运行的图像。Containerfile 包含基本映像的配置以及入口点。争论可以通过 args 钥匙。

有关编写 Docker 操作的更多信息,请查看 GitHub 文档。 请记住,GitHub 和 Forgejo 之间的某些细节有所不同。

composite 行动

复合操作只是正常工作流的一系列步骤,打包为易于重复使用的操作。

综合行动有以下信息 runs 键:

1
2
3
4
5
6
7
8
9
10
11
runs:
using: 'composite'
steps:
- name: Print message
run: echo "$MESSAGE"
shell: bash
env:
MESSAGE: ${{ inputs.message }} # This also needs to be defined in the inputs section above.

- name: Some other step
...

复合操作可以像正常工作流一样使用其他操作。您还可以编写脚本,将它们提交到操作存储库,然后在操作中使用它们,并用 run 钥匙。
常见问题:

gitHub连接超时问题

actions 去克隆 gitHub 上的 checkout 以及 login-action 的时候报错,Timeout

解决方案

可以本地电脑去 gitHub 将相对应需要的 仓库 拉取 到本地后,再推送到我们自己的代码托管平台。

并推送标签:

1
git push origin <版本号>

随后我们引用:

ACTIONS_CHECKOUT_URL :  http://git\.example\.cn/angindem/checkout

1
2
3
4
- name: Checkout repository
uses: ${{ vars.ACTIONS_CHECKOUT_URL }}@v3
with:
fetch-depth: 0 # Ensure all history is fetched

(node:139) [DEP0040] DeprecationWarning: The `punycode` module is deprecated. Please use a userland alternative instead.

登录问题

这里登录仓库需要 https 协议,如果需要http方面需要额外配置,至于http额外配置我后面再看看。

Checkout repository不访问自己的代码仓

如果遇到 Checkout repository 不访问自己的代码仓,可以直接纯手动 git clone 拉取也是可以的。

解决方案

1
2
3
4
5
- name: Checkout repository
run: |
git clone --depth=1 \
"${FORGEJO_SERVER_URL:-http://git.angindem.cn}/${GITHUB_REPOSITORY:-Angindem/Adesign-web}.git" .
ls -al

觉得不错的话,给点打赏吧 ୧(๑•̀⌄•́๑)૭

微信二维码

wechat pay

支付宝二维码

ali pay

创建私有docker镜像仓库+自动化构建镜像
http://blog.angindem.cn/2025/12/09/Angindem-CSDN博客/191_191/
作者
Angindem
发布于
2025年12月9日
许可协议